Soft Homemade Turkish Flatbread Made in a Pan
Whenever I want fresh bread without turning on the oven, I make this Turkish flatbread, also known as Bazlama. It is one of those recipes that looks impressive but is actually very simple to prepare at home. The dough comes together with everyday ingredients, rises beautifully, and cooks in a hot pan within minutes. Every batch comes out with a golden outside, a fluffy center, and a soft texture that stays tender long after cooking.
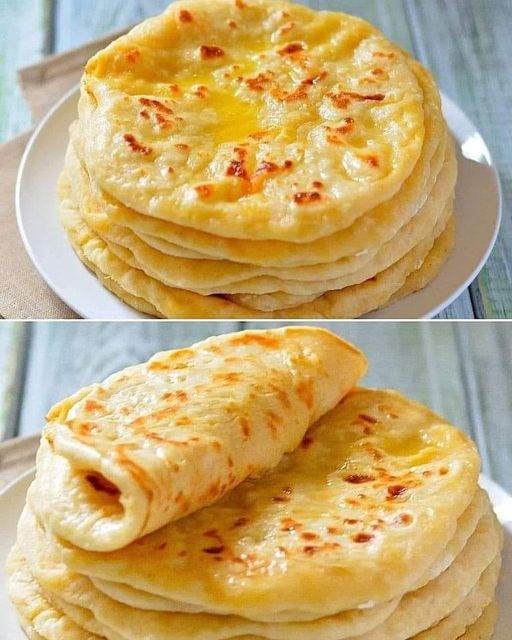
One of the things I enjoy most about making this bread is watching it puff up while it cooks. The bubbles that appear on the surface are a good sign that the dough is ready to flip, and once turned over, each flatbread inflates into a soft pillow. It is always satisfying to see that happen.
This bread works well for breakfast, lunch, or dinner. I often serve it alongside grilled meat, roasted vegetables, creamy dips, or soups. It is also delicious with a little butter while still warm. Because the dough contains Greek yogurt, the bread has a light tang that balances the flavor perfectly while keeping every bite soft and moist.
What Makes Bazlama Different?
Bazlama is a traditional Turkish-style flatbread made with yeast and yogurt. Unlike thinner flatbreads, this version is thick, fluffy, and slightly chewy. The outside develops light golden spots from the hot pan while the inside stays soft and airy.
A few simple ingredients create a dough that is easy to work with after resting. Although traditional recipes may take several hours to ferment, this version uses a small amount of baking powder along with yeast, which helps create an extra fluffy texture without a long waiting time.
The finished bread is flexible enough for wraps, sturdy enough for dipping into sauces, and soft enough to enjoy on its own.
Ingredients You’ll Need
I always measure my ingredients carefully because bread recipes are much more reliable when everything is balanced.
Instant Dry Yeast
Instant dry yeast helps the dough rise and creates the airy texture inside the bread. I always mix it with warm water and sugar first to make sure it becomes frothy before adding it to the flour.
Sugar
Only a small amount of sugar is needed. It helps activate the yeast and supports the rising process without making the bread sweet.
Plain Flour
Plain flour forms the base of the dough and gives the flatbread structure while keeping it soft.
Full-Fat Greek Yogurt
Greek yogurt adds moisture, tenderness, and a slight tangy flavor. Using full-fat yogurt produces the softest texture.
Salt
Salt enhances the overall flavor and balances the dough.
Baking Powder
Although optional, I always include it because it gives the bread a little extra lift and makes each flatbread puff up beautifully during cooking.
Olive Oil
A small amount of olive oil is used only for greasing the bowl and lightly coating the pan before cooking.
Preparing the Dough
Making this dough is easier than it may seem. I usually use a stand mixer because it saves time, but kneading by hand also works well if you are patient.
Step 1: Activate the Yeast
I begin by combining the warm water, instant dry yeast, and sugar in a cup. After stirring everything together, I leave it for about five minutes.
When the mixture develops a frothy layer on top, I know the yeast is active and ready to use. If there is no foam, I start again with fresh yeast before continuing.
Step 2: Mix the Dough
Into a large mixing bowl, I add:
- Plain flour
- Full-fat Greek yogurt
- Salt
- Baking powder
- Activated yeast mixture
Using the dough hook on low speed, I mix everything until the ingredients begin to combine into a rough dough.
If the dough feels slightly dry after mixing for a minute, I add the extra tablespoon of water. If it is already soft and slightly sticky, I leave the additional water out.
Kneading Until Smooth
Proper kneading is the key to soft homemade flatbread.
I continue kneading for about 5 to 6 minutes until the dough becomes smooth, stretchy, and elastic. At first it feels sticky, but after several minutes it transforms into a soft dough that pulls away from the sides of the bowl.
When kneading by hand, I avoid adding too much extra flour because excess flour can make the finished bread dry instead of fluffy.
A slightly sticky dough produces much softer flatbreads after cooking.
First Rise
Once the dough is smooth, I lightly grease the mixing bowl with olive oil.
I place the dough back into the bowl, turning it once so every side is lightly coated with oil.
Next, I cover the bowl and leave it somewhere warm for about one hour.
During this resting time, the dough slowly doubles in size. This step is important because it allows the yeast to create air inside the dough, giving the finished flatbread its light and fluffy texture.
I never rush this stage because well-risen dough always cooks better and produces softer bread.
By the end of the first rise, the dough feels airy, soft, and much easier to shape for the next stage of the recipe.
Folding and Dividing the Dough
Once the dough has doubled in size, I gently transfer it onto a lightly floured work surface. Instead of pressing all the air out, I handle it carefully so the dough keeps as much of its light texture as possible.
I gently shape the dough into a rectangle. Then I fold the bottom third toward the center, followed by folding the top third over it, just like folding a letter. Sometimes I simply roll it into a log, and both methods work well.
Next, I divide the dough into 9 equal pieces. Keeping the portions similar in size helps every flatbread cook evenly.
To shape each piece, I fold the edges inward and pinch them together underneath until the top becomes smooth. This creates neat little dough balls that are easier to roll out and hold their shape while resting.
Second Rest
After shaping all the dough balls, I place them on a lightly floured surface and cover them with a clean kitchen towel.
I let them rest for 15 to 20 minutes.
This short resting period makes a noticeable difference. The dough relaxes, making it much easier to roll without shrinking back. It also helps create a lighter texture once cooked.
While the dough is resting, I prepare my cooking pan and rolling area so everything is ready when it’s time to cook.
Rolling the Dough
- I lightly dust the countertop with flour and begin rolling each dough ball.
- Each one is rolled into a circle measuring about 18 cm (7 inches) across. I try to keep the thickness even so every flatbread cooks consistently.
- Rather than rolling all nine at once, I usually prepare three at a time. While one is cooking, I can roll another, keeping the process smooth without taking up too much workspace.
- Before placing the dough into the pan, I gently brush away any excess flour. This prevents burnt flour from collecting in the pan during cooking.
Cooking the Flatbread
Cooking Bazlama is one of my favorite parts because the transformation happens so quickly.
I heat a large non-stick frying pan or cast iron skillet over medium-high heat.
A small drizzle of olive oil goes into the pan, and I wipe away the excess with paper towel. The surface only needs a very thin coating.
Once the pan is properly heated, I place the rolled dough into it.
First Side
I cook the first side for about 1 minute.
As the bread cooks, small bubbles begin appearing across the surface. This tells me the dough is cooking properly and is ready to flip.
Second Side
After turning it over, I cook the second side for around 45 seconds.
This is usually when the magic happens. The bread starts puffing into a large balloon, creating an airy pocket inside.
Watching each flatbread inflate is always satisfying and shows that the dough was prepared correctly.
Final Flip
I flip it one final time for about 10 seconds.
This helps finish cooking the center without over-browning the outside.
As soon as it is done, I transfer the bread to a plate and immediately cover it with a clean kitchen towel. Covering the bread traps a little steam, keeping every flatbread wonderfully soft.
I repeat the same process until all 9 flatbreads are cooked.
Ways I Like to Serve Bazlama
One reason I make this bread so often is because it goes with almost everything.
Some of my favorite serving ideas include:
- Serving it warm with butter.
- Pairing it with roasted or grilled meats.
- Using it as a wrap for chicken, lamb, beef, or vegetables.
- Enjoying it with hummus, labneh, or other creamy dips.
- Dipping it into soups, stews, or curry.
- Brushing it with garlic butter and herbs before lightly toasting.
- Filling the pocket with cheese and warming it until melted.
- Using leftovers as a quick homemade pizza base.
Its soft texture makes it suitable for both simple meals and larger family dinners.
Storage Tips
Freshly cooked Bazlama always tastes best while still warm.
If I have leftovers, I allow them to cool completely before storing them.
I place the flatbreads inside an airtight container or wrap them well and keep them at room temperature.
I avoid refrigerating them because the bread tends to dry out much faster in the refrigerator.
Reheating
To soften leftover flatbread, I lightly sprinkle a few drops of water over each one.
For a quick option, I microwave it for about 20 seconds.
If I prefer using the oven, I wrap several flatbreads in damp baking paper and warm them at 180°C (350°F) for about 5 to 6 minutes.
This method restores much of their original softness.
Freezing
Bazlama freezes very well.
Before freezing, I place a sheet of baking paper between each flatbread so they separate easily later.
Then I store them inside a freezer-safe bag or airtight container.
Whenever I need fresh bread, I simply remove the number I want and reheat them directly. They stay soft and taste almost as fresh as the day they were made.
Helpful Tips for Success
Whenever I prepare this recipe, I keep a few simple things in mind:
- Measure the flour carefully for consistent results.
- Use warm water, not hot water, when activating the yeast.
- Give the dough enough time to rise properly.
- Avoid adding unnecessary extra flour while kneading.
- Preheat the pan before cooking.
- Cover each cooked flatbread immediately with a clean towel.
- Roll each dough ball to an even thickness.
- Cook over medium-high heat so the bread browns without burning.
These small details make a big difference in achieving soft, fluffy flatbreads every time.
Frequently Asked Questions
Is Bazlama the same as pita bread?
No. Although both are soft flatbreads, Bazlama contains Greek yogurt, making it thicker, softer, and more tender than traditional pita bread.
Can I make smaller or larger flatbreads?
Yes. The dough can easily be divided into smaller or larger portions. Just remember to roll each piece to roughly the same thickness so they cook evenly.
Why does my flatbread not puff?
This usually happens if the dough has not risen enough, the pan is not hot enough, or the dough has been rolled too thick or unevenly.
Can I knead the dough without a stand mixer?
Absolutely. The dough can easily be kneaded by hand. It may feel sticky at first, but after several minutes it becomes smooth and elastic.
Making homemade Turkish Flatbread has become one of my favorite bread recipes because it is simple, reliable, and incredibly versatile. Every batch comes out soft, fluffy, and full of flavor, making it perfect for everyday meals or sharing with family and friends. Once freshly cooked and served warm, it is hard to resist reaching for another piece.
Easy Homemade Turkish Flatbread (Bazlama)
This homemade Turkish Flatbread (Bazlama) is soft, fluffy, and cooked in a hot skillet until beautifully golden. Made with simple pantry ingredients and Greek yogurt, each flatbread develops a lightly crisp exterior while remaining tender and chewy inside. Enjoy it warm with dips, grilled meats, soups, or use it as a wrap for your favorite fillings.
9
servings25
minutes20
minutes179
kcal1
hour15
minutesIngredients
¾ cup warm water (180ml)
1 tablespoon warm water, if needed (20ml)
3 teaspoons instant dry yeast
¾ teaspoon sugar
390g plain flour (all-purpose flour)
½ cup full-fat Greek yogurt
1½ teaspoons salt
1½ teaspoons baking powder (optional)
Olive oil, for greasing the bowl and lightly coating the pan
Directions
- Activate the Yeast
Mix the warm water, instant dry yeast, and sugar in a small cup. Leave it for about 5 minutes until the mixture becomes frothy. - Prepare the Dough
In a large mixing bowl or stand mixer, combine the flour, Greek yogurt, salt, baking powder, and the yeast mixture.
Mix until a rough dough forms. - Knead
Knead the dough on low speed for about 5–6 minutes until smooth and elastic.
If the dough appears dry, add the extra tablespoon of warm water. If it remains slightly sticky, do not add additional flour unless absolutely necessary. - First Rise
Lightly grease a bowl with olive oil.
Place the dough inside, turning it once so all sides are lightly coated.
Cover and leave in a warm place for about 1 hour or until doubled in size. - Fold and Divide
Transfer the risen dough onto a lightly floured surface.
Shape it into a rectangle and fold it like a letter, or simply roll it into a log.
Divide the dough into 9 equal portions. - Shape
Shape each portion into a smooth ball by folding the edges underneath.
Cover with a clean kitchen towel and let the dough balls rest for 15–20 minutes. - Roll
Roll each dough ball into a circle approximately 18 cm (7 inches) wide.
Brush away any excess flour before cooking. - Cook
Heat a lightly greased non-stick skillet or cast iron pan over medium-high heat.
Cook each flatbread:
First side: 1 minute
Second side: 45 seconds
Final flip: 10 seconds
Transfer each cooked flatbread to a plate and immediately cover with a clean kitchen towel to keep it soft.
Repeat until all flatbreads are cooked.
Nutrition Facts
- Calories: 179kcal
- Fat: 1g
- Saturated Fat: 0.1g
- Trans Fat: 0.001g
- Polyunsaturated Fat: 0.2g
- Monounsaturated Fat: 0.2g
- Cholesterol: 1mg
- Sodium: 466mg
- Potassium: 100mg
- Carbohydrates: 36g
- Fiber: 2g
- Sugar: 1g
- Protein: 7g
- Vitamin A: 0.4mcg
- Vitamin C: 0.01mg
- Calcium: 60mg
- Iron: 2mg