Author: admin1

  • Air Fryer Crab Cakes with Chipotle Sauce

    Air Fryer Crab Cakes with Chipotle Sauce

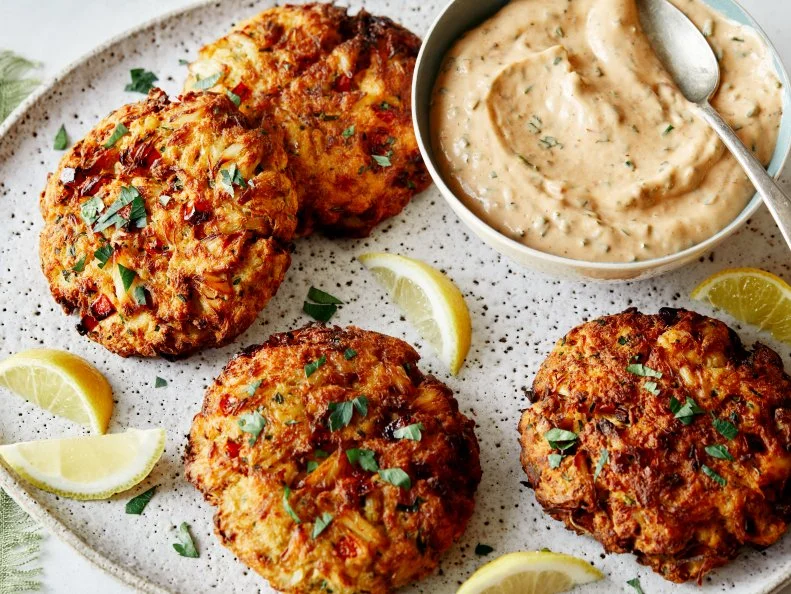
    These crab cakes are golden, crispy on the outside, and tender on the inside, with sweet, delicate crab meat enhanced by herbs and a touch of spice. Paired with a smoky chipotle sauce, this dish makes a perfect appetizer, lunch, or dinner. This recipe yields 6 crab cakes.


    Ingredients:

    For the Crab Cakes:

    • 1 pound lump crab meat, picked over for shells
    • 1/2 cup panko breadcrumbs, plus extra for coating
    • 1/4 cup mayonnaise
    • 1 large egg, lightly beaten
    • 1 teaspoon Dijon mustard
    • 1 teaspoon Worcestershire sauce
    • 1 teaspoon Old Bay seasoning
    • 1/2 teaspoon garlic powder
    • 1/4 teaspoon smoked paprika
    • 2 tablespoons finely chopped fresh parsley
    • 2 tablespoons finely chopped green onions
    • Salt and black pepper, to taste
    • 1–2 teaspoons olive oil for brushing

    For the Chipotle Sauce:

    • 1/2 cup mayonnaise
    • 1–2 teaspoons chipotle peppers in adobo sauce, minced (adjust to taste)
    • 1 teaspoon lime juice
    • 1/2 teaspoon honey or maple syrup
    • Salt and pepper, to taste

    Instructions:

    1. Prepare the Chipotle Sauce

    1. In a small bowl, whisk together mayonnaise, minced chipotle, lime juice, honey, salt, and pepper until smooth.
    2. Taste and adjust spiciness or sweetness as desired.
    3. Refrigerate until ready to serve.

    2. Prepare the Crab Cake Mixture

    1. In a large mixing bowl, gently combine the crab meat, 1/2 cup panko breadcrumbs, mayonnaise, egg, Dijon mustard, Worcestershire sauce, Old Bay seasoning, garlic powder, smoked paprika, parsley, green onions, salt, and black pepper.
    2. Use a gentle folding motion to avoid breaking up the crab too much.

    3. Form the Crab Cakes

    1. Divide the mixture into 6 equal portions.
    2. Shape each portion into a round patty, about 3 inches in diameter and 1 inch thick.
    3. Optional: Lightly dredge each patty in additional panko breadcrumbs for extra crispiness.
    4. Brush each crab cake lightly with olive oil to promote browning in the air fryer.

    4. Preheat the Air Fryer

    1. Preheat the air fryer to 375°F (190°C) for 3–5 minutes.

    5. Air Fry the Crab Cakes

    1. Place the crab cakes in the air fryer basket in a single layer. Avoid overcrowding; cook in batches if needed.
    2. Air fry at 375°F (190°C) for 10–12 minutes, flipping halfway through cooking.
    3. The crab cakes are done when golden brown on both sides and heated through.

    6. Serve

    1. Carefully transfer crab cakes to a serving plate.
    2. Serve with the chipotle sauce on the side or drizzled on top.
    3. Optional garnishes: chopped fresh parsley, lime wedges, or a sprinkle of smoked paprika.

    Tips for Perfect Air Fryer Crab Cakes

    • Use lump crab meat for large, tender pieces that shine in each bite.
    • Don’t overmix: Gently fold ingredients to preserve the texture of the crab.
    • Crispiness tip: Lightly brushing with olive oil or using panko coating gives a golden, crunchy exterior without deep frying.
    • Check doneness: Crab cakes cook quickly in the air fryer; they are done when firm, golden, and heated through.
    • Make ahead: Form crab cakes and refrigerate for 30 minutes before cooking to help them hold their shape.
    • Serve with sides: Air-fried vegetables, a fresh salad, or roasted potatoes complement the dish beautifully.
  • Air Fryer Zucchini

    Air Fryer Zucchini

    Air fryer zucchini is a quick, healthy, and flavorful side dish or snack. It becomes tender inside while developing a lightly crisp and golden exterior. This recipe serves 3–4 as a side dish.


    Ingredients:

    • 2 medium zucchinis, washed and ends trimmed
    • 2 tablespoons olive oil or avocado oil
    • 1 teaspoon garlic powder
    • 1 teaspoon paprika (smoked paprika optional)
    • 1/2 teaspoon onion powder
    • Salt and freshly ground black pepper, to taste
    • Optional garnish: grated Parmesan cheese, chopped fresh parsley, or a squeeze of lemon

    Instructions:

    1. Prepare the Zucchini

    1. Cut the zucchinis into your preferred shape:
      • Rounds: 1/4-inch thick slices
      • Sticks: 1/4-inch thick batons for a fry-like presentation
    2. Pat the zucchini lightly with a paper towel to remove excess moisture for better crisping.

    2. Season the Zucchini

    1. In a large bowl, toss the zucchini with olive oil.
    2. Add garlic powder, paprika, onion powder, salt, and black pepper. Toss until evenly coated.

    3. Preheat the Air Fryer

    1. Preheat the air fryer to 400°F (200°C) for 3–5 minutes.

    4. Air Fry the Zucchini

    1. Place the zucchini in the air fryer basket in a single layer. Avoid overcrowding to ensure even cooking and crisping.
    2. Air fry at 400°F (200°C) for 8–12 minutes, shaking the basket halfway through.
    3. Check for doneness: zucchini should be tender inside with lightly browned edges.

    5. Serve

    1. Transfer the zucchini to a serving plate.
    2. Optional: Sprinkle with grated Parmesan cheese, chopped parsley, or a squeeze of fresh lemon juice for added flavor.
    3. Serve immediately as a side dish, snack, or appetizer.

    Tips for Perfect Air Fryer Zucchini

    • Uniform size: Cut zucchini pieces to the same size for even cooking.
    • Avoid sogginess: Pat dry and avoid overcrowding in the air fryer basket.
    • Crispier option: Toss with a small amount of breadcrumbs or panko before air frying for extra crunch.
    • Seasoning variations: Try Italian seasoning, chili powder, smoked paprika, or a drizzle of balsamic glaze for different flavors.
    • Storage: Leftover air fryer zucchini can be stored in the refrigerator for 1–2 days. Reheat briefly in the air fryer to restore crispness.
  • Air Fryer Salmon with Maple Soy

    Air Fryer Salmon with Maple Soy

    This dish combines tender, flaky salmon with a sweet and savory maple-soy glaze, cooked quickly in the air fryer for a perfectly caramelized finish. It’s healthy, flavorful, and takes under 20 minutes from start to finish. Serves 2–4, depending on fillet size.


    Ingredients:

    For the Salmon:

    • 2–4 salmon fillets (6–8 ounces each), skin-on or skinless
    • Salt and black pepper, to taste
    • 1 teaspoon olive oil or cooking spray

    For the Maple Soy Glaze:

    • 3 tablespoons maple syrup
    • 2 tablespoons soy sauce (or tamari for gluten-free)
    • 1 teaspoon rice vinegar or apple cider vinegar
    • 1 teaspoon sesame oil
    • 1 clove garlic, minced
    • 1/2 teaspoon grated fresh ginger (optional for extra depth)
    • 1/4 teaspoon crushed red pepper flakes (optional for mild heat)

    Optional Garnishes:

    • Toasted sesame seeds
    • Chopped green onions
    • Lemon or lime wedges

    Instructions:

    1. Prepare the Maple Soy Glaze

    1. In a small bowl, whisk together maple syrup, soy sauce, rice vinegar, sesame oil, garlic, ginger (if using), and red pepper flakes.
    2. Set aside about 1 tablespoon of the glaze for drizzling at the end.

    2. Prepare the Salmon

    1. Pat the salmon fillets dry with paper towels to remove excess moisture.
    2. Lightly brush or spray olive oil on the salmon.
    3. Season with a pinch of salt and black pepper on both sides.

    3. Preheat the Air Fryer

    1. Preheat your air fryer to 400°F (200°C) for 3–5 minutes.

    4. Air Fry the Salmon

    1. Brush or drizzle the fillets with the maple-soy glaze, reserving some for later.
    2. Place the salmon fillets in the air fryer basket skin-side down if the skin is on. Make sure they are in a single layer and not overcrowded.
    3. Air fry at 400°F (200°C) for 8–12 minutes, depending on thickness.
      • Thicker fillets may need closer to 12 minutes.
      • Salmon is done when it flakes easily with a fork and reaches 125–130°F (51–54°C) for medium.
    4. Optional: For extra caramelization, brush additional glaze during the last 2 minutes of cooking.

    5. Serve

    1. Carefully transfer the salmon to a serving plate.
    2. Drizzle with the reserved glaze.
    3. Garnish with toasted sesame seeds, chopped green onions, and lemon or lime wedges.
    4. Serve immediately alongside steamed vegetables, rice, or a fresh salad.

    Tips for Perfect Air Fryer Salmon with Maple Soy

    • Do not overcook: Air fryer salmon cooks quickly. Keep an eye on the fillets to maintain tender, juicy flesh.
    • Pat salmon dry: Removing excess moisture ensures the glaze sticks and caramelizes beautifully.
    • Skin-on fillets: Cooking skin-side down helps protect the delicate flesh and makes it easier to handle.
    • Glaze variations: Add a teaspoon of hoisin sauce, mirin, or a dash of sriracha to customize flavor.
    • Storage: Leftover glazed salmon can be stored in the fridge for 1–2 days; reheat gently in the air fryer or oven to maintain moisture.
  • Air Fryer Mushrooms

    Air Fryer Mushrooms

    Air fryer mushrooms are a quick, healthy, and flavorful side dish or appetizer. They become tender on the inside while developing a lightly crisp and caramelized exterior. This recipe serves 4 as a side dish.


    Ingredients:

    • 1 pound fresh mushrooms (white button, cremini, or baby bella), cleaned and stems trimmed
    • 2 tablespoons olive oil or melted butter
    • 1 teaspoon garlic powder
    • 1 teaspoon dried thyme or Italian seasoning
    • 1/2 teaspoon smoked paprika (optional for depth)
    • Salt and freshly ground black pepper, to taste
    • Optional garnish: chopped fresh parsley, grated Parmesan cheese, or a squeeze of lemon

    Instructions:

    1. Prepare the Mushrooms

    1. Gently clean the mushrooms using a damp paper towel or soft brush. Avoid soaking them in water, as mushrooms absorb moisture and become soggy.
    2. Trim the stems if necessary, and leave mushrooms whole if small or halve/quarter larger mushrooms for even cooking.

    2. Season the Mushrooms

    1. In a large bowl, toss the mushrooms with olive oil or melted butter.
    2. Sprinkle garlic powder, thyme or Italian seasoning, smoked paprika (if using), salt, and black pepper. Toss until all mushrooms are evenly coated.

    3. Preheat the Air Fryer

    1. Preheat your air fryer to 375°F (190°C) for 3–5 minutes.

    4. Air Fry the Mushrooms

    1. Place the seasoned mushrooms in the air fryer basket in a single layer. Avoid overcrowding to ensure even cooking and browning.
    2. Air fry at 375°F (190°C) for 10–12 minutes, shaking the basket halfway through cooking for even crisping.
    3. For extra caramelization, cook an additional 1–2 minutes, checking frequently to avoid burning.

    5. Serve

    1. Transfer the mushrooms to a serving bowl.
    2. Garnish with chopped fresh parsley, a sprinkle of Parmesan cheese, or a squeeze of fresh lemon juice for added brightness.
    3. Serve immediately as a side dish, appetizer, or topping for steak, pasta, or salads.

    Tips for Perfect Air Fryer Mushrooms

    • Uniform size: Cut mushrooms into similar sizes for even cooking.
    • Don’t overcrowd: Overcrowding traps steam and prevents crisping. Cook in batches if necessary.
    • Oil choice: Olive oil adds richness, while a light spray of avocado or grapeseed oil works for a lower-fat version.
    • Seasoning variations: Try adding soy sauce, balsamic glaze, smoked paprika, or fresh rosemary for different flavor profiles.
    • Storage: Air-fried mushrooms are best eaten immediately but can be stored in the fridge for up to 2 days; reheat in the air fryer to restore crispness.
  • Spicy Shrimp Crispy Rice

    Spicy Shrimp Crispy Rice

    This dish combines tender, juicy shrimp with crunchy, golden crispy rice and a spicy, flavorful sauce. It’s a perfect appetizer, lunch, or light dinner with a satisfying mix of textures and bold flavors. This recipe serves 4.


    Ingredients:

    For the Crispy Rice:

    • 2 cups cooked sushi rice or short-grain rice, cooled
    • 2 tablespoons vegetable oil or neutral oil
    • Salt, to taste

    For the Shrimp:

    • 1/2 pound medium shrimp, peeled and deveined
    • 1 tablespoon soy sauce
    • 1 teaspoon sesame oil
    • 1 teaspoon cornstarch
    • 1/4 teaspoon black pepper

    For the Spicy Sauce:

    • 2 tablespoons mayonnaise
    • 1–2 teaspoons sriracha or chili garlic sauce (adjust to taste)
    • 1 teaspoon lime juice
    • 1 teaspoon honey or sugar (optional, for balance)

    Optional Garnishes:

    • Chopped green onions
    • Toasted sesame seeds
    • Microgreens or cilantro

    Instructions:

    1. Prepare the Crispy Rice

    1. Line a baking sheet or tray with parchment paper.
    2. Spread the cooked rice into small bite-sized rounds or squares, pressing lightly to form compact shapes. You can use a spoon, cookie cutter, or mold.
    3. Heat 2 tablespoons of oil in a nonstick skillet over medium-high heat.
    4. Carefully place the rice shapes in the skillet. Cook without moving for 3–5 minutes until the bottom is golden brown and crispy.
    5. Flip gently and crisp the other side for 2–3 minutes. Remove and set aside on a paper towel-lined plate.
    6. Season lightly with salt.

    2. Prepare the Shrimp

    1. In a small bowl, toss the shrimp with soy sauce, sesame oil, cornstarch, and black pepper until evenly coated.
    2. Heat 1 tablespoon of oil in a skillet over medium-high heat.
    3. Add the shrimp and cook for 1–2 minutes per side until pink, opaque, and slightly caramelized. Do not overcook.
    4. Remove from heat and set aside.

    3. Make the Spicy Sauce

    1. In a small bowl, mix together mayonnaise, sriracha, lime juice, and honey until smooth.
    2. Taste and adjust the spiciness or sweetness as needed.

    4. Assemble the Dish

    1. Place the crispy rice on a serving plate.
    2. Top each rice piece with a shrimp.
    3. Drizzle the spicy sauce over the shrimp generously.
    4. Garnish with chopped green onions, sesame seeds, and microgreens or cilantro for extra freshness.

    Tips for Perfect Spicy Shrimp Crispy Rice

    • Use short-grain or sushi rice for compact shapes; long-grain rice won’t hold together as well.
    • Make sure the rice is completely cooled before forming shapes; this prevents sticking and crumbling.
    • Adjust spiciness to your taste; sriracha can be substituted with gochujang or hot chili paste.
    • For extra crunch, lightly pan-fry in a nonstick skillet with minimal oil rather than deep frying.
    • Leftover crispy rice can be reheated in a hot skillet for a few minutes to restore crispiness.

    This dish is a perfect balance of crispy, tender, and spicy—a restaurant-quality appetizer or light meal that impresses with both flavor and texture.

  • Air Fryer Salmon Recipes

    Air Fryer Salmon Recipes

    Air frying salmon is a quick, healthy, and convenient way to get tender, flaky fish with a perfectly crisp exterior. Depending on the seasoning or marinade, you can make it sweet, savory, spicy, or tangy. These recipes assume salmon fillets are about 6 ounces each.


    Basic Instructions for Air Frying Salmon

    1. Preheat the Air Fryer: Preheat to 400°F (200°C) for 3–5 minutes.
    2. Prepare the Salmon: Pat the fillets dry with paper towels to remove excess moisture. This ensures better browning.
    3. Lightly Oil or Spray: Brush the salmon with 1 teaspoon of olive oil per fillet or spray lightly with cooking spray. This keeps the fish moist and prevents sticking.
    4. Season or Marinate: Choose your flavor profile (see recipes below).
    5. Air Fry: Place salmon skin-side down (if skin is on) in the basket. Cook at 400°F (200°C) for 8–12 minutes depending on thickness. Check for doneness; salmon should flake easily with a fork and reach 125–130°F (51–54°C) for medium doneness.
    6. Rest: Let salmon rest for 2 minutes before serving.

    1. Lemon Garlic Herb Salmon

    Ingredients:

    • 2 salmon fillets
    • 1 tablespoon olive oil
    • 2 cloves garlic, minced
    • Juice of 1/2 lemon
    • 1 teaspoon dried oregano or thyme
    • Salt and pepper to taste

    Instructions:

    1. Mix olive oil, garlic, lemon juice, oregano, salt, and pepper in a small bowl.
    2. Brush the mixture over the salmon fillets.
    3. Air fry at 400°F (200°C) for 8–10 minutes.
    4. Serve with lemon wedges and fresh parsley.

    2. Honey Soy Glazed Salmon

    Ingredients:

    • 2 salmon fillets
    • 2 tablespoons soy sauce (or tamari for gluten-free)
    • 1 tablespoon honey or maple syrup
    • 1 teaspoon sesame oil
    • 1 garlic clove, minced
    • Optional: sesame seeds and chopped green onions for garnish

    Instructions:

    1. Whisk together soy sauce, honey, sesame oil, and garlic.
    2. Brush or marinate salmon for 15–20 minutes.
    3. Air fry at 400°F (200°C) for 8–12 minutes.
    4. Garnish with sesame seeds and green onions before serving.

    3. Cajun Spiced Salmon

    Ingredients:

    • 2 salmon fillets
    • 1 tablespoon olive oil
    • 1 teaspoon paprika
    • 1/2 teaspoon cayenne pepper (adjust for heat)
    • 1/2 teaspoon garlic powder
    • 1/2 teaspoon onion powder
    • 1/4 teaspoon dried thyme
    • Salt and black pepper to taste

    Instructions:

    1. Combine spices in a small bowl.
    2. Rub olive oil over the salmon and coat evenly with the spice mix.
    3. Air fry at 400°F (200°C) for 8–12 minutes.
    4. Serve with a wedge of lime and steamed vegetables.

    4. Maple Dijon Salmon

    Ingredients:

    • 2 salmon fillets
    • 1 tablespoon Dijon mustard
    • 1 tablespoon maple syrup
    • 1/2 teaspoon smoked paprika
    • Salt and pepper to taste

    Instructions:

    1. Mix Dijon mustard, maple syrup, paprika, salt, and pepper.
    2. Brush over the salmon fillets.
    3. Air fry at 400°F (200°C) for 8–10 minutes.
    4. Serve with roasted potatoes or a fresh salad.

    Tips for Perfect Air Fryer Salmon

    • Do not overcrowd: Leave space between fillets for even air circulation.
    • Check internal temperature: Aim for 125–130°F (51–54°C) for medium; salmon will continue to cook slightly while resting.
    • Skin-on fillets: Crispy skin is achieved by placing skin-side down. If skinless, lightly oil to prevent sticking.
    • Marinate wisely: Acidic marinades (lemon, vinegar, soy sauce) should not exceed 30 minutes to avoid “cooking” the salmon before air frying.
    • Add veggies: For a complete meal, air fry vegetables like asparagus, broccoli, or bell peppers alongside salmon at the same temperature, adjusting cooking times slightly.

    Optional Serving Suggestions

    • Serve over steamed rice or quinoa with a drizzle of extra sauce.
    • Pair with roasted or air-fried vegetables like zucchini, carrots, or Brussels sprouts.
    • Top with fresh herbs (parsley, cilantro, or dill) for added freshness.
    • Add a squeeze of lemon or lime for bright flavor before serving.
  • Fried Okra

    Fried Okra

    Fried okra is a Southern classic—crispy on the outside, tender on the inside, and full of flavor. It’s perfect as a side dish, snack, or appetizer. This recipe serves about 4 people.


    Ingredients:

    For the Okra:

    • 1 pound fresh okra
    • 1/2 cup all-purpose flour
    • 1/2 cup cornmeal (yellow or fine)
    • 1 teaspoon salt
    • 1/2 teaspoon black pepper
    • 1/2 teaspoon garlic powder (optional)
    • 1/4 teaspoon cayenne pepper (optional, for a slight kick)
    • 1 large egg
    • 1/4 cup milk

    For Frying:

    • 1 to 2 cups vegetable oil or peanut oil (enough for shallow frying)

    Optional for Serving:

    • Hot sauce
    • Lemon wedges

    Instructions:

    1. Prepare the Okra

    1. Rinse the okra under cold water and pat dry with a clean towel.
    2. Trim the stem ends and cut the okra into 1/2-inch thick slices.
    3. Pat the slices dry again to reduce moisture—this helps achieve a crispier coating.

    2. Prepare the Coatings

    1. In a shallow dish, mix the flour, cornmeal, salt, black pepper, garlic powder, and cayenne pepper (if using).
    2. In a separate shallow bowl, whisk together the egg and milk until smooth.

    3. Coat the Okra

    1. Dip the okra slices into the egg mixture, letting any excess drip off.
    2. Dredge the slices in the cornmeal-flour mixture, coating evenly on all sides.
    3. Place the coated okra on a plate and let sit for 5 minutes to allow the coating to adhere better.

    4. Fry the Okra

    1. Heat the vegetable oil in a large skillet over medium heat to about 350°F (175°C).
    2. Fry the okra in small batches to avoid overcrowding, which can lower the oil temperature and make the coating soggy.
    3. Cook each batch for 3–5 minutes, turning occasionally, until the okra is golden brown and crispy.
    4. Use a slotted spoon to remove the okra and place it on a paper towel-lined plate to drain excess oil.

    5. Serve

    1. Serve immediately while hot and crispy.
    2. Optional: Sprinkle lightly with additional salt, a dash of hot sauce, or a squeeze of fresh lemon juice.
    3. Fried okra pairs perfectly with Southern dishes like fried chicken, barbecue, or mashed potatoes.

    Tips for Perfect Fried Okra

    • Dry the okra thoroughly before coating to prevent sogginess.
    • Cornmeal in the coating gives extra crunch and a slightly nutty flavor.
    • Maintain the oil temperature around 350°F (175°C) for even, crispy frying.
    • Leftover fried okra can be reheated in a 375°F (190°C) oven for 5–7 minutes to restore crispiness.
    • For a lighter version, fried okra can be baked: toss coated okra in a little oil and bake at 425°F (220°C) for 15–20 minutes, flipping halfway.
  • Yankee Red Flannel Hash

    Yankee Red Flannel Hash

    Yankee Red Flannel Hash is a traditional New England dish made with a colorful mix of beets, potatoes, onions, and sometimes corned beef. It’s hearty, flavorful, and perfect for breakfast, brunch, or even a comforting dinner. This recipe serves 4–6 people.


    Ingredients:

    For the Hash:

    • 2 medium beets, peeled and diced into 1/2-inch cubes
    • 2 medium red potatoes, peeled and diced into 1/2-inch cubes
    • 1 medium onion, finely diced
    • 1 tablespoon vegetable oil or butter
    • 1/2 pound leftover corned beef or cooked ham, diced (optional, traditional in some recipes)
    • Salt and black pepper, to taste
    • 1/2 teaspoon smoked paprika (optional, adds depth)
    • 1 teaspoon fresh thyme leaves (or 1/2 teaspoon dried thyme)

    For Garnish (Optional):

    • Chopped fresh parsley or chives
    • Fried or poached eggs (optional, for serving)

    Instructions:

    1. Cook the Beets

    1. Place the diced beets in a medium saucepan and cover with water.
    2. Bring to a boil, then reduce the heat and simmer for 15–20 minutes, or until tender but not mushy. Drain and set aside.
    3. Tip: You can also roast the beets in the oven at 400°F (200°C) for 25–30 minutes for a deeper flavor.

    2. Cook the Potatoes

    1. Place the diced potatoes in a separate pot of salted water and bring to a boil.
    2. Cook for 8–10 minutes until just tender but still holding their shape. Drain and set aside.

    3. Sauté the Onions

    1. Heat 1 tablespoon of oil or butter in a large skillet over medium heat.
    2. Add the diced onion and cook for 3–4 minutes until translucent and fragrant.

    4. Combine Ingredients

    1. Add the cooked beets and potatoes to the skillet with the onions.
    2. If using corned beef or ham, add it now.
    3. Gently fold the mixture together to combine without breaking up the vegetables.

    5. Season and Brown

    1. Season with salt, black pepper, smoked paprika, and thyme.
    2. Cook over medium heat, pressing down lightly with a spatula, for 5–7 minutes. Allow the hash to develop a slight crisp on the bottom before gently stirring or flipping sections.
    3. Continue cooking for another 5 minutes until the hash is heated through and slightly caramelized.

    6. Serve

    1. Transfer the hash to a serving dish or serve directly from the skillet.
    2. Garnish with chopped parsley or chives for color and freshness.
    3. Optional: Top with fried or poached eggs for a hearty breakfast or brunch.

    Tips for the Best Red Flannel Hash

    • Use firm, fresh beets to avoid a mushy texture.
    • Parboiling the potatoes and beets ensures even cooking and helps maintain the bright color of the beets.
    • Pressing the hash in the skillet and letting it brown adds flavor and a slightly crispy texture.
    • Leftover hash can be refrigerated for 2–3 days and reheated in a skillet to restore crispiness.
    • For a vegetarian version, omit the corned beef and add extra vegetables like bell peppers or mushrooms.
  • Creole Jambalaya

    Creole Jambalaya

    Creole jambalaya is a classic Louisiana dish that’s hearty, flavorful, and full of aromatic spices. It combines rice with a mix of vegetables, meats, and seafood for a one-pot meal that’s perfect for family dinners or gatherings. This recipe serves 6–8 people.


    Ingredients:

    For the Meat and Seafood:

    • 1 pound boneless, skinless chicken thighs or breasts, cut into bite-sized pieces
    • 1/2 pound andouille sausage, sliced into 1/4-inch rounds
    • 1/2 pound raw shrimp, peeled and deveined (optional, add near the end of cooking)

    For the Vegetables (The “Holy Trinity”):

    • 1 large onion, finely diced
    • 1 green bell pepper, finely diced
    • 2 celery stalks, finely diced
    • 3 cloves garlic, minced
    • 1 can (14.5 oz) diced tomatoes with juice
    • 1 cup chicken broth (low-sodium preferred)

    For the Rice and Seasoning:

    • 1 1/2 cups long-grain white rice, rinsed
    • 2 teaspoons Creole seasoning (or a mix of paprika, cayenne, thyme, oregano, black pepper, and salt)
    • 1/2 teaspoon smoked paprika
    • 1/2 teaspoon dried thyme
    • 1/4 teaspoon cayenne pepper (adjust to taste)
    • 2 bay leaves
    • Salt and black pepper to taste

    Optional Garnishes:

    • Chopped green onions
    • Fresh parsley
    • Hot sauce

    Instructions:

    1. Prepare the Ingredients

    1. Cut chicken into bite-sized pieces and slice sausage.
    2. Dice the onion, bell pepper, and celery, and mince the garlic.
    3. Rinse the rice under cold water until the water runs clear, then drain.

    2. Cook the Meats

    1. Heat 2 tablespoons of vegetable oil in a large, heavy-bottomed pot or Dutch oven over medium-high heat.
    2. Add the chicken pieces and cook until lightly browned on all sides, about 4–5 minutes. Remove and set aside.
    3. Add the sliced andouille sausage to the pot and cook for 2–3 minutes until browned. Remove and set aside with the chicken.

    3. Cook the Vegetables

    1. In the same pot, add the onion, bell pepper, and celery. Sauté for 5–6 minutes until softened and aromatic.
    2. Add the garlic and cook for 30 seconds until fragrant.
    3. Stir in the diced tomatoes with their juice. Let simmer for 2–3 minutes.

    4. Add Rice and Seasonings

    1. Stir in the rinsed rice and cook for 1–2 minutes to lightly toast it.
    2. Add Creole seasoning, smoked paprika, thyme, cayenne, bay leaves, and a pinch of salt and pepper. Stir well to coat the rice and vegetables with the spices.

    5. Add Liquids and Simmer

    1. Pour in the chicken broth and return the cooked chicken and sausage to the pot.
    2. Bring the mixture to a gentle boil.
    3. Reduce the heat to low, cover, and simmer for 20–25 minutes, stirring occasionally, until the rice is tender and has absorbed most of the liquid.

    6. Add Shrimp (Optional)

    1. If using shrimp, add them during the last 5 minutes of cooking. Cover and cook until the shrimp are pink and cooked through.
    2. Remove the pot from heat and let the jambalaya sit, covered, for 5 minutes to allow flavors to meld.

    7. Serve

    1. Remove the bay leaves.
    2. Serve hot, garnished with chopped green onions, parsley, and a dash of hot sauce if desired.

    Tips for the Best Creole Jambalaya

    • Using a heavy-bottomed pot ensures even cooking and prevents rice from sticking.
    • Do not stir too frequently after adding the liquid; letting the rice cook undisturbed helps it absorb the flavors and prevents it from becoming mushy.
    • Adjust spices and heat according to taste; Creole dishes are flavorful but not always extremely spicy.
    • For a smoky depth, you can add a few dashes of smoked paprika or a teaspoon of liquid smoke.
    • Leftovers store well in the fridge for 2–3 days and often taste even better the next day.
  • Apple Cider Doughnuts

    Apple Cider Doughnuts

    These apple cider doughnuts are soft, fluffy, and infused with warm fall spices. They have a subtle apple flavor and a sweet cinnamon-sugar coating that makes them irresistible. This recipe makes about 12–14 doughnuts.


    Ingredients:

    For the Doughnuts:

    • 1 1/2 cups all-purpose flour
    • 1 teaspoon baking powder
    • 1/2 teaspoon baking soda
    • 1/2 teaspoon salt
    • 1 teaspoon ground cinnamon
    • 1/2 teaspoon ground nutmeg
    • 1/4 teaspoon ground cloves (optional)
    • 1/2 cup granulated sugar
    • 1/4 cup brown sugar, packed
    • 1/4 cup unsalted butter, melted and cooled
    • 1 large egg
    • 1/2 cup buttermilk
    • 1/2 cup apple cider, reduced to 1/4 cup (instructions below)
    • 1 teaspoon vanilla extract

    For the Cinnamon-Sugar Coating:

    • 1/2 cup granulated sugar
    • 1 teaspoon ground cinnamon
    • 2 tablespoons unsalted butter, melted (for brushing)

    Instructions:

    1. Reduce the Apple Cider

    1. Pour 1/2 cup of apple cider into a small saucepan.
    2. Bring to a boil over medium heat, then reduce the heat to low and simmer until the cider is reduced to about 1/4 cup. This concentrates the flavor.
    3. Let the reduced cider cool completely before using.

    2. Prepare the Dry Ingredients

    1. In a medium bowl, whisk together flour, baking powder, baking soda, salt, cinnamon, nutmeg, and cloves.
    2. Set aside.

    3. Mix the Wet Ingredients

    1. In a large bowl, combine granulated sugar, brown sugar, and melted butter. Mix until smooth.
    2. Beat in the egg, then stir in the buttermilk, reduced apple cider, and vanilla extract until fully incorporated.

    4. Combine Wet and Dry Ingredients

    1. Gradually add the dry ingredients to the wet mixture, folding gently with a spatula until just combined. Avoid overmixing; the batter should be slightly thick but pourable.

    5. Prepare for Cooking

    • For Frying:
      1. Heat 2–3 inches of vegetable oil in a deep pot to 375°F (190°C).
      2. Spoon or pipe the batter carefully into the hot oil, frying 2–3 doughnuts at a time to avoid overcrowding.
    • For Baking (Optional Healthier Version):
      1. Preheat oven to 375°F (190°C) and grease a doughnut pan.
      2. Fill each cavity about 3/4 full with batter.

    6. Cook the Doughnuts

    • Frying Method:
      1. Fry each doughnut for 1–2 minutes per side, or until golden brown and puffed.
      2. Remove with a slotted spoon and drain on paper towels.
    • Baking Method:
      1. Bake for 12–15 minutes, or until a toothpick inserted comes out clean.
      2. Let cool slightly in the pan before removing.

    7. Coat the Doughnuts

    1. In a small bowl, mix the granulated sugar and cinnamon for the coating.
    2. Brush the warm doughnuts lightly with melted butter, then roll them in the cinnamon-sugar mixture until evenly coated.

    8. Serve

    1. Serve the doughnuts warm for the best texture and flavor.
    2. They pair beautifully with coffee, hot chocolate, or apple cider for a cozy treat.
    3. Store leftovers in an airtight container at room temperature for up to 2 days; reheat briefly in the oven or microwave before serving.

    Tips for Perfect Apple Cider Doughnuts

    • Reducing the cider intensifies the apple flavor without adding excess liquid to the batter.
    • Don’t overmix the dough; it keeps the doughnuts light and tender.
    • Fry at the correct temperature (375°F / 190°C) to ensure golden, crisp exteriors and fully cooked interiors.
    • Cinnamon-sugar coating sticks best when doughnuts are warm.