Author: admin1

  • Air-Fryer Potato Chips

    Air-Fryer Potato Chips

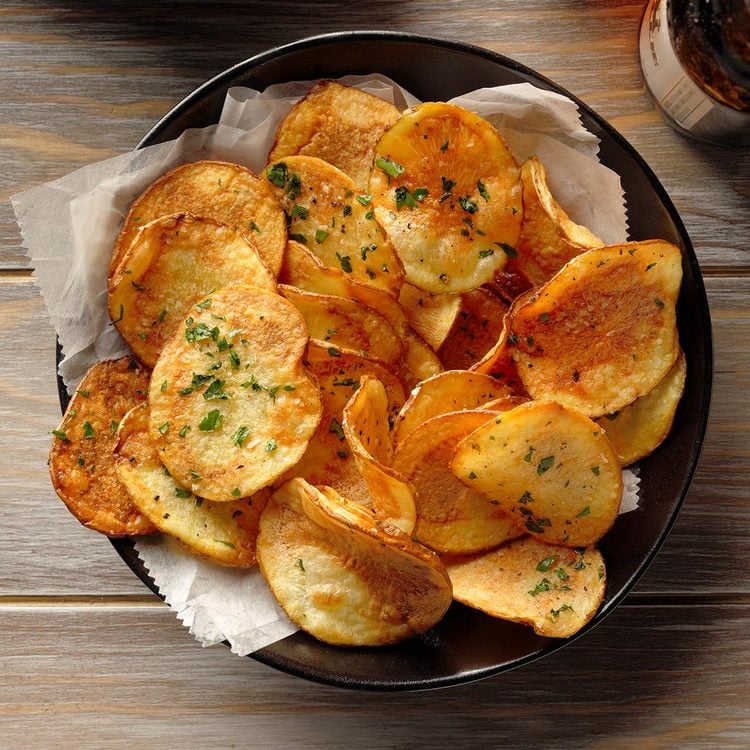
    Air-fryer potato chips are crispy, golden, and much healthier than traditional deep-fried chips. Using an air fryer allows you to achieve a perfect crunch with minimal oil while retaining the natural potato flavor. This recipe covers careful slicing, seasoning, and air-frying techniques for consistently crisp chips.


    Ingredients

    • 2 large russet potatoes (or Yukon Gold for a slightly creamier texture)
    • 1–2 tablespoons olive oil or neutral vegetable oil
    • 1 teaspoon kosher salt, plus more to taste
    • Optional seasonings:
      • 1/2 teaspoon smoked paprika
      • 1/4 teaspoon garlic powder
      • 1/4 teaspoon black pepper
      • 1/4 teaspoon cayenne pepper for heat

    Equipment Needed

    • Air fryer
    • Mandoline slicer or sharp knife
    • Large bowl
    • Clean kitchen towels or paper towels
    • Mixing spoon or tongs
    • Cooling rack or plate lined with paper towels

    Preparation

    1. Preparing the Potatoes

    Wash and peel the potatoes if desired (keeping the skin adds texture and flavor).

    Using a mandoline slicer or a sharp knife, slice the potatoes as thinly as possible, ideally about 1/16 inch thick. Uniform slices are key to even cooking and crispiness.

    Place the potato slices in a large bowl of cold water. Soak for at least 30 minutes to remove excess starch. This step prevents sticking and promotes crispiness.

    Drain the potatoes and pat them completely dry using clean kitchen towels or paper towels.


    2. Seasoning

    Transfer the dried potato slices to a large bowl.

    Add the olive oil and toss gently to coat every slice lightly. Excess oil can prevent crisping, so use sparingly.

    Sprinkle with kosher salt and any optional seasonings like paprika, garlic powder, black pepper, or cayenne.

    Toss again to ensure even distribution of oil and seasoning.


    Air-Frying the Chips

    3. Preheating

    Preheat the air fryer to 360°F. Preheating ensures consistent cooking and crispiness.


    4. Cooking in Batches

    Place a single layer of potato slices in the air fryer basket. Avoid overcrowding; overlapping slices will steam rather than crisp.

    Air-fry for 10–15 minutes, shaking the basket or flipping the slices halfway through cooking to ensure even browning.

    Check the chips frequently after 8 minutes, as cooking times may vary depending on slice thickness and air fryer model.


    5. Cooling

    Once golden brown and crispy, transfer the chips to a cooling rack or plate lined with paper towels.

    Allow them to cool slightly; they will continue to crisp as they cool.

    Repeat with the remaining slices in batches.


    Serving

    Serve air-fryer potato chips warm or at room temperature.

    They pair beautifully with dips like ketchup, ranch, guacamole, or a spicy aioli.


    Storage

    Store cooled chips in an airtight container at room temperature for 2–3 days. Avoid refrigeration, which can make chips soggy.


    Tips for Best Results

    • Slice potatoes as thinly and uniformly as possible for even crisping
    • Dry potatoes thoroughly before oiling to prevent sogginess
    • Avoid stacking slices in the air fryer
    • Experiment with seasonings for variety, such as rosemary, parmesan, or chili powder
  • Blue-Ribbon Beef Nachos

    Blue-Ribbon Beef Nachos

    Blue-ribbon beef nachos are a hearty, crowd-pleasing dish designed to showcase perfectly seasoned beef, crisp tortilla chips, and layers of melted cheese with balanced toppings. This recipe focuses on proper layering, bold seasoning, and careful baking to ensure every bite is flavorful and satisfying, making it ideal for parties, game days, or casual family meals.


    Ingredients

    For the Seasoned Beef

    • 1 1/2 pounds ground beef (80/20 preferred)
    • 1 small onion, finely diced
    • 2 cloves garlic, minced
    • 2 teaspoons chili powder
    • 1 teaspoon ground cumin
    • 1 teaspoon smoked paprika
    • 1/2 teaspoon dried oregano
    • 1/2 teaspoon kosher salt, plus more to taste
    • 1/2 teaspoon freshly ground black pepper
    • 1/4 teaspoon cayenne pepper (optional)
    • 1/2 cup beef broth or water

    For the Nachos

    • 12–14 ounces sturdy tortilla chips
    • 3 cups shredded cheese (cheddar, Monterey Jack, or a blend)
    • 1 cup refried beans, warmed (optional)
    • 1 cup black beans, rinsed and drained
    • 1 cup corn kernels (optional)

    Toppings (Added After Baking)

    • 1 cup diced tomatoes or pico de gallo
    • 1/2 cup sliced jalapeños (fresh or pickled)
    • 1/2 cup sour cream
    • 1/2 cup guacamole or sliced avocado
    • 1/4 cup chopped fresh cilantro
    • Lime wedges, for serving

    Equipment Needed

    • Large skillet
    • Baking sheet or large oven-safe platter
    • Aluminum foil or parchment paper
    • Wooden spoon or spatula
    • Oven

    Preparation

    1. Cooking the Seasoned Beef

    Preheat the oven to 400°F.

    Heat a large skillet over medium heat. Add the ground beef and cook, breaking it apart with a spoon, until browned and cooked through.

    Drain excess fat if necessary, leaving a small amount for flavor.

    Add the diced onion and cook for 3–4 minutes until softened.

    Stir in the garlic and cook for 30 seconds until fragrant.


    2. Seasoning the Beef

    Add the chili powder, cumin, smoked paprika, oregano, salt, black pepper, and cayenne pepper.

    Stir well to coat the beef evenly with spices.

    Pour in the beef broth and simmer for 5–7 minutes until most of the liquid has reduced and the mixture is flavorful and moist but not soupy.

    Taste and adjust seasoning as needed.


    Assembling the Nachos

    3. Layering

    Line a large baking sheet with foil or parchment paper.

    Spread half of the tortilla chips in an even layer.

    Spoon half of the seasoned beef over the chips.

    Add small dollops of refried beans, scatter black beans and corn, and sprinkle with one-third of the shredded cheese.

    Repeat with remaining chips, beef, beans, and another layer of cheese. Reserve a small amount of cheese for the final topping.

    Finish with the remaining cheese evenly distributed on top.


    Baking

    4. Baking the Nachos

    Place the baking sheet in the preheated oven.

    Bake for 10–15 minutes, or until the cheese is fully melted, bubbly, and lightly golden.

    Remove from the oven immediately to prevent overcooking.


    Adding Fresh Toppings

    5. Garnishing

    While the nachos are hot, add diced tomatoes or pico de gallo and sliced jalapeños.

    Drizzle sour cream over the top or serve it on the side.

    Add guacamole or avocado slices and sprinkle with chopped cilantro.

    Serve with lime wedges.


    Serving

    Serve blue-ribbon beef nachos immediately while hot and crisp.

    For gatherings, place the nachos in the center of the table with extra toppings and sauces on the side.


    Tips for Best Results

    • Use thick, sturdy tortilla chips to support toppings
    • Layer ingredients to ensure even distribution
    • Avoid overloading with wet toppings before baking
    • Serve immediately to maintain crispness
  • Amish Sugar Cookies

    Amish Sugar Cookies

    Amish sugar cookies are soft, tender, and lightly sweet cookies known for their cake-like texture and subtle vanilla flavor. Unlike crisp sugar cookies, these cookies remain pillowy and moist, making them a favorite for everyday baking, church gatherings, and family occasions.


    Ingredients

    Cookie Dough

    • 1 cup unsalted butter, softened to room temperature
    • 1 cup granulated sugar
    • 1 cup powdered sugar
    • 1 cup vegetable oil
    • 2 large eggs
    • 1 teaspoon vanilla extract
    • 4 1/2 cups all-purpose flour
    • 1 teaspoon baking soda
    • 1 teaspoon cream of tartar
    • 1/2 teaspoon kosher salt

    For Rolling

    • 1/4 cup granulated sugar

    Equipment Needed

    • Large mixing bowl
    • Electric mixer or wooden spoon
    • Medium mixing bowl
    • Whisk
    • Baking sheets
    • Parchment paper or greased baking sheets
    • Cookie scoop or spoon
    • Wire cooling racks

    Preparation

    1. Preparing the Dough

    In a large mixing bowl, cream together the softened butter, granulated sugar, and powdered sugar until light and fluffy. This step incorporates air, contributing to the soft texture.

    Add the vegetable oil and mix until fully incorporated.

    Beat in the eggs one at a time, mixing well after each addition. Stir in the vanilla extract.


    2. Combining Dry Ingredients

    In a separate bowl, whisk together the flour, baking soda, cream of tartar, and salt.

    Gradually add the dry ingredients to the wet mixture, mixing until a soft, smooth dough forms. Do not overmix.

    Cover the dough and refrigerate for at least 1 hour. Chilling makes the dough easier to handle and prevents excessive spreading.


    Shaping and Baking

    3. Forming the Cookies

    Preheat the oven to 375°F.

    Line baking sheets with parchment paper or lightly grease them.

    Using a cookie scoop or spoon, portion the dough into 1 1/2-inch balls.

    Roll each ball in granulated sugar to coat lightly.

    Place the dough balls on the prepared baking sheets, spacing them about 2 inches apart.


    4. Baking the Cookies

    Bake for 8–10 minutes, or until the edges are just set and the tops appear slightly cracked. The cookies should remain pale and soft, not browned.

    Remove from the oven and allow the cookies to cool on the baking sheet for 2–3 minutes before transferring to wire racks.


    Cooling and Storage

    Allow the cookies to cool completely on wire racks.

    Store Amish sugar cookies in an airtight container at room temperature for up to 5 days. They also freeze well for longer storage.


    Tips for Best Results

    • Do not overbake; the cookies should remain soft
    • Chilling the dough improves texture and handling
    • Use room-temperature butter for proper creaming
    • Cream of tartar contributes to tenderness and flavor
  • Barbecue Chicken

    Barbecue Chicken

    Barbecue chicken is a classic dish known for its smoky flavor, juicy meat, and sticky, caramelized sauce. Whether cooked on a grill or in an oven, proper seasoning, controlled heat, and careful saucing are essential to achieving tender chicken with a flavorful glaze.


    Ingredients

    For the Chicken

    • 4 pounds chicken pieces (bone-in, skin-on thighs, drumsticks, or split breasts)
    • 2 tablespoons vegetable oil
    • 2 teaspoons kosher salt
    • 1 1/2 teaspoons freshly ground black pepper
    • 1 teaspoon paprika
    • 1 teaspoon garlic powder
    • 1 teaspoon onion powder

    For the Barbecue Sauce

    • 1 1/2 cups ketchup
    • 1/3 cup apple cider vinegar
    • 1/4 cup brown sugar, packed
    • 2 tablespoons molasses
    • 1 tablespoon Worcestershire sauce
    • 1 tablespoon yellow mustard
    • 1 teaspoon smoked paprika
    • 1/2 teaspoon chili powder
    • 1/2 teaspoon black pepper
    • 1/2 teaspoon salt

    Equipment Needed

    • Outdoor grill or oven
    • Saucepan
    • Basting brush
    • Tongs
    • Meat thermometer
    • Aluminum foil

    Preparation

    1. Preparing the Chicken

    Pat the chicken pieces dry with paper towels. Dry skin promotes better browning.

    In a small bowl, combine the salt, black pepper, paprika, garlic powder, and onion powder.

    Rub the chicken with vegetable oil, then season evenly on all sides with the spice mixture.

    Allow the chicken to rest at room temperature for 20–30 minutes before cooking.


    Making the Barbecue Sauce

    2. Cooking the Sauce

    In a saucepan over medium heat, combine the ketchup, apple cider vinegar, brown sugar, molasses, Worcestershire sauce, mustard, smoked paprika, chili powder, black pepper, and salt.

    Bring the mixture to a gentle simmer, stirring frequently.

    Reduce heat to low and simmer for 10–15 minutes until slightly thickened. Remove from heat and set aside.


    Cooking the Chicken

    3. Grilling Method (Preferred)

    Preheat the grill to medium heat, around 375°F, and set it up for indirect cooking.

    Place the chicken on the grill skin-side up, away from direct flames. Cover and cook for 25–30 minutes, turning occasionally.

    Move the chicken over direct heat and cook for an additional 5–10 minutes to crisp the skin, turning carefully to avoid burning.

    Begin basting the chicken with barbecue sauce during the final 10 minutes of cooking, turning and basting frequently to build layers of glaze.

    The chicken is done when the internal temperature reaches 165°F in the thickest part.


    4. Oven Method (Alternative)

    Preheat the oven to 400°F.

    Arrange the seasoned chicken on a foil-lined baking sheet or in a baking dish.

    Bake uncovered for 35–40 minutes, turning once halfway through.

    Brush the chicken generously with barbecue sauce and return to the oven for an additional 10–15 minutes until glazed and fully cooked.


    Resting and Serving

    5. Resting

    Remove the chicken from the grill or oven and loosely tent with foil.

    Allow it to rest for 5–10 minutes to retain juices.


    6. Serving

    Serve barbecue chicken hot with additional sauce on the side.

    Popular accompaniments include coleslaw, baked beans, corn on the cob, or potato salad.


    Tips for Best Results

    • Use indirect heat to prevent burning
    • Apply sauce near the end to avoid scorching
    • Bone-in chicken stays juicier than boneless
    • Always verify doneness with a thermometer
  • California Tamale Pie

    California Tamale Pie

    California tamale pie is a comforting casserole-style dish that blends seasoned meat, vegetables, and a savory sauce beneath a golden cornmeal topping. Unlike traditional tamales, this dish is baked in a single pan and reflects early California cuisine influenced by Mexican flavors and American home cooking. It is hearty, flavorful, and ideal for family meals.


    Ingredients

    For the Meat Filling

    • 1 1/2 pounds ground beef (or a mix of beef and pork)
    • 1 medium onion, finely chopped
    • 1 green bell pepper, finely chopped
    • 2 cloves garlic, minced
    • 1 can (14–15 ounces) diced tomatoes, undrained
    • 1 can (8 ounces) tomato sauce
    • 1 tablespoon chili powder
    • 1 teaspoon ground cumin
    • 1 teaspoon paprika
    • 1/2 teaspoon dried oregano
    • 1/2 teaspoon kosher salt, plus more to taste
    • 1/2 teaspoon freshly ground black pepper
    • 1/4 teaspoon cayenne pepper (optional)
    • 1 cup cooked corn kernels (fresh, frozen, or canned and drained)
    • 1/2 cup sliced black olives (optional)

    For the Cornmeal Topping

    • 1 cup yellow cornmeal
    • 1 cup all-purpose flour
    • 1 tablespoon baking powder
    • 1 teaspoon kosher salt
    • 1 cup whole milk
    • 1/3 cup vegetable oil or melted butter
    • 1 large egg

    Optional Additions

    • 1 cup shredded cheddar or Monterey Jack cheese
    • Chopped fresh cilantro for garnish

    Equipment Needed

    • Large skillet
    • 9 x 13-inch baking dish
    • Mixing bowls
    • Whisk
    • Wooden spoon or spatula
    • Oven

    Preparation

    1. Preparing the Meat Filling

    Preheat the oven to 375°F.

    Heat a large skillet over medium heat. Add the ground beef and cook, breaking it apart with a spoon, until browned and fully cooked. Drain excess fat if necessary.

    Add the chopped onion and bell pepper to the skillet. Cook for 4–5 minutes until softened.

    Stir in the garlic and cook for 30 seconds until fragrant.


    2. Seasoning and Simmering

    Add the diced tomatoes, tomato sauce, chili powder, cumin, paprika, oregano, salt, black pepper, and cayenne pepper.

    Stir well to combine and bring the mixture to a gentle simmer.

    Reduce heat to low and simmer for 10–15 minutes, allowing the flavors to meld and the sauce to thicken slightly.

    Stir in the corn and black olives, if using. Taste and adjust seasoning.


    3. Assembling the Filling

    Spread the meat mixture evenly into the greased baking dish.

    If using cheese, sprinkle it evenly over the meat layer.


    Preparing the Cornmeal Topping

    4. Mixing the Batter

    In a mixing bowl, whisk together the cornmeal, flour, baking powder, and salt.

    In a separate bowl, combine the milk, oil or melted butter, and egg.

    Pour the wet ingredients into the dry ingredients and whisk until just combined. The batter should be smooth and pourable.


    5. Adding the Topping

    Carefully pour the cornmeal batter over the meat filling, spreading it evenly with a spatula to cover the surface.


    Baking

    6. Baking the Tamale Pie

    Place the baking dish in the preheated oven.

    Bake for 30–35 minutes, or until the topping is golden brown and a toothpick inserted into the cornmeal layer comes out clean.

    If the top browns too quickly, loosely cover with foil during the final 10 minutes of baking.


    Cooling and Serving

    7. Resting and Serving

    Remove the dish from the oven and allow it to rest for 10–15 minutes before serving. This helps the layers set and makes slicing easier.

    Serve warm, garnished with chopped cilantro if desired.


    Serving Suggestions

    California tamale pie pairs well with a green salad, sliced avocado, sour cream, or fresh salsa on the side.


    Tips for Best Results

    • Simmer the meat filling to deepen flavor
    • Avoid overmixing the cornmeal batter
    • Let the casserole rest before slicing
    • Adjust spice levels to taste

  • Gooey Butter Cake

    Gooey Butter Cake

    Gooey butter cake is a rich, indulgent dessert that originated in St. Louis, Missouri. It is characterized by a dense cake base topped with a soft, custard-like layer that remains gooey in the center while lightly set on top. This dessert is sweet, buttery, and best served at room temperature or slightly warm.


    Ingredients

    For the Cake Base

    • 1 box yellow cake mix
    • 1/2 cup unsalted butter, melted
    • 1 large egg

    For the Gooey Topping

    • 8 ounces cream cheese, softened
    • 2 large eggs
    • 1 teaspoon vanilla extract
    • 1/2 cup unsalted butter, melted
    • 4 cups powdered sugar

    For Finishing

    • Powdered sugar, for dusting

    Equipment Needed

    • 9 x 13-inch baking pan
    • Large mixing bowl
    • Medium mixing bowl
    • Electric mixer or whisk
    • Spatula
    • Measuring cups and spoons
    • Oven

    Preparation

    1. Preparing the Baking Pan

    Preheat the oven to 350°F.

    Grease the baking pan generously with butter or nonstick spray. For easier removal, the pan may be lined with parchment paper, leaving overhang on the sides.


    Making the Cake Base

    2. Mixing the Base Layer

    In a large bowl, combine the yellow cake mix, melted butter, and egg.

    Mix until fully incorporated. The dough will be thick and slightly sticky.

    Press the mixture evenly into the bottom of the prepared baking pan, creating a smooth and uniform layer.


    Making the Gooey Topping

    3. Preparing the Cream Cheese Mixture

    In a medium bowl, beat the softened cream cheese until smooth and free of lumps.

    Add the eggs and mix until fully incorporated.

    Stir in the vanilla extract and melted butter, mixing until smooth.

    Gradually add the powdered sugar, one cup at a time, mixing well after each addition until the mixture is smooth, thick, and creamy.


    Assembling and Baking

    4. Baking the Cake

    Carefully pour the gooey topping over the cake base, spreading it evenly with a spatula.

    Place the pan in the preheated oven and bake for 40–45 minutes.

    The edges should be set and lightly golden, while the center remains slightly soft and jiggly. Avoid overbaking, as the cake will continue to set as it cools.


    Cooling and Serving

    5. Cooling

    Remove the cake from the oven and place it on a wire rack.

    Allow the cake to cool completely in the pan. This step is essential for achieving the proper gooey texture.


    6. Serving

    Once cooled, dust the top generously with powdered sugar.

    Cut into squares and serve at room temperature or slightly warm.


    Storage

    Store gooey butter cake covered at room temperature for up to 2 days, or refrigerate for up to 5 days. Bring to room temperature before serving for best texture.


    Tips for Best Results

    • Do not overbake; the center should remain soft
    • Use full-fat cream cheese for proper texture
    • Allow the cake to cool fully before slicing
    • A glass baking dish promotes even baking
  • Classic Macaroni Salad

    Classic Macaroni Salad

    Classic macaroni salad is a creamy, tangy, and slightly sweet cold pasta salad commonly served at picnics, barbecues, and family gatherings. It is known for its tender macaroni, crunchy vegetables, and well-balanced dressing that becomes more flavorful as the salad chills.


    Ingredients

    For the Salad

    • 1 pound elbow macaroni
    • 1 cup celery, finely diced
    • 1/2 cup red bell pepper, finely diced
    • 1/2 cup carrot, finely grated or finely diced
    • 1/3 cup red onion, finely minced
    • 3 hard-boiled eggs, peeled and chopped (optional but traditional in many versions)
    • 2 tablespoons fresh parsley, finely chopped (optional)

    For the Dressing

    • 1 1/2 cups mayonnaise
    • 2 tablespoons yellow mustard
    • 2 tablespoons apple cider vinegar
    • 2 tablespoons granulated sugar
    • 1 teaspoon kosher salt, plus more to taste
    • 1/2 teaspoon freshly ground black pepper
    • 1/4 teaspoon paprika
    • 1/4 teaspoon garlic powder
    • 2–3 tablespoons milk, as needed for consistency

    Equipment Needed

    • Large pot
    • Colander
    • Large mixing bowl
    • Small mixing bowl
    • Whisk
    • Cutting board and knife

    Preparation

    1. Cooking the Macaroni

    Bring a large pot of well-salted water to a rolling boil. Add the elbow macaroni and cook according to package instructions until just tender.

    The macaroni should be cooked slightly past al dente, as it firms up when chilled.

    Drain the macaroni thoroughly and rinse under cold water to stop the cooking process and remove excess starch. Allow it to drain completely.

    Transfer the cooled macaroni to a large mixing bowl.


    2. Preparing the Vegetables

    While the macaroni cools, prepare the vegetables.

    Finely dice the celery, red bell pepper, carrot, and red onion. Uniform, small pieces ensure even distribution and a balanced bite.

    Chop the hard-boiled eggs and parsley, if using.

    Add all prepared ingredients to the bowl with the macaroni.


    Making the Dressing

    3. Mixing the Dressing

    In a separate bowl, whisk together the mayonnaise, yellow mustard, apple cider vinegar, sugar, salt, black pepper, paprika, and garlic powder.

    Whisk until the dressing is smooth and well combined.

    Add milk one tablespoon at a time until the dressing reaches a creamy, pourable consistency.

    Taste and adjust seasoning as needed.


    Assembling the Salad

    4. Combining and Chilling

    Pour the dressing over the macaroni and vegetable mixture.

    Using a spatula, gently fold everything together until evenly coated.

    Cover the bowl tightly and refrigerate for at least 2 hours, preferably 4 hours or overnight. Chilling allows the flavors to meld and improves texture.

    Before serving, stir the salad gently and adjust seasoning or add a small amount of milk or mayonnaise if the salad has thickened.


    Serving

    Serve the macaroni salad cold as a side dish alongside grilled meats, sandwiches, or barbecue favorites.

    Garnish with a light sprinkle of paprika or chopped parsley, if desired.


    Tips for Best Results

    • Slightly overcooked pasta prevents dryness after chilling
    • Finely diced vegetables ensure balanced flavor
    • Chill thoroughly before serving for best taste
    • Adjust sweetness and tang to personal preference
  • Biscuits and Sausage Gravy

    Biscuits and Sausage Gravy

    Biscuits and sausage gravy is a traditional Southern comfort dish featuring flaky, buttery biscuits smothered in a rich, creamy sausage gravy. The contrast between the crisp exterior of the biscuits and the savory, peppery gravy makes this dish a hearty and satisfying meal, commonly served for breakfast or brunch.


    Ingredients

    For the Biscuits

    • 2 cups all-purpose flour
    • 1 tablespoon baking powder
    • 1 teaspoon baking soda
    • 1 teaspoon kosher salt
    • 6 tablespoons cold unsalted butter, cut into small cubes
    • 3/4 cup cold buttermilk, plus extra for brushing

    For the Sausage Gravy

    • 1 pound breakfast sausage (pork sausage preferred)
    • 1/4 cup all-purpose flour
    • 3 cups whole milk, warmed
    • 1/2 teaspoon kosher salt (adjust to taste)
    • 1 teaspoon freshly ground black pepper
    • 1/4 teaspoon cayenne pepper (optional)
    • 1/4 teaspoon garlic powder (optional)

    Equipment Needed

    • Large mixing bowl
    • Pastry cutter or fork
    • Rolling pin
    • Biscuit cutter or round glass
    • Baking sheet
    • Cast-iron skillet or heavy-bottomed pan
    • Whisk
    • Oven

    Preparing the Biscuits

    1. Mixing the Dough

    Preheat the oven to 425°F.

    In a large bowl, whisk together the flour, baking powder, baking soda, and salt. Add the cold butter cubes and cut them into the flour using a pastry cutter or fork until the mixture resembles coarse crumbs with pea-sized bits of butter remaining. These butter pockets create flaky layers during baking.

    Pour in the cold buttermilk and gently stir until the dough just comes together. Do not overmix.


    2. Shaping and Cutting

    Turn the dough out onto a lightly floured surface. Gently pat it into a rectangle about 1-inch thick. Fold the dough in half, rotate it, and pat it down again. Repeat this folding process 2–3 times to build layers.

    Pat the dough to a final thickness of about 1 inch. Cut biscuits using a floured cutter, pressing straight down without twisting to ensure proper rising.

    Place the biscuits on a baking sheet so they are just touching for soft sides.


    3. Baking the Biscuits

    Brush the tops lightly with buttermilk.

    Bake for 12–15 minutes, or until the biscuits are tall, golden brown, and fully cooked through.

    Remove from the oven and keep warm.


    Preparing the Sausage Gravy

    4. Cooking the Sausage

    Heat a large skillet over medium heat. Add the sausage and cook, breaking it into small crumbles with a spoon.

    Cook until the sausage is fully browned and no pink remains. Do not drain the fat; it is essential for flavor and forming the gravy base.


    5. Making the Roux

    Sprinkle the flour evenly over the cooked sausage. Stir continuously to coat the sausage in the flour.

    Cook for 1–2 minutes to remove the raw flour taste. The mixture should look slightly thick and lightly golden.


    6. Adding the Milk

    Gradually pour in the warm milk while whisking constantly to prevent lumps.

    Continue cooking, stirring frequently, as the gravy thickens. This process takes about 5–7 minutes.


    7. Seasoning the Gravy

    Season the gravy with salt, black pepper, cayenne pepper, and garlic powder if using.

    Simmer gently until the gravy reaches a thick, spoon-coating consistency. Adjust seasoning as needed.

    If the gravy becomes too thick, add a small amount of milk to loosen it.


    Serving

    Split the warm biscuits in half and place them on plates.

    Spoon generous amounts of sausage gravy over the biscuits, allowing it to soak into the layers.

    Serve immediately while hot.


    Tips for Success

    • Keep biscuit ingredients cold for maximum flakiness
    • Do not overwork biscuit dough
    • Warm milk prevents gravy from becoming lumpy
    • Freshly ground black pepper is essential for authentic flavor
  • Wisconsin Butter-Basted Burgers

    Wisconsin Butter-Basted Burgers

    Wisconsin butter-basted burgers are rich, juicy, and deeply flavorful, celebrating two iconic Wisconsin staples: high-quality beef and dairy butter. Unlike grilled burgers that rely on open flames, this method uses a hot skillet or griddle and repeated basting with butter to create a crisp crust while keeping the interior moist and tender.


    Ingredients

    For the Burger Patties

    • 2 pounds ground beef (80/20 blend recommended for juiciness)
    • 2 teaspoons kosher salt
    • 1 1/2 teaspoons freshly ground black pepper
    • 1 teaspoon garlic powder
    • 1 teaspoon onion powder

    For Butter Basting

    • 8 tablespoons unsalted Wisconsin butter
    • 2 cloves garlic, lightly smashed (optional)
    • 2 sprigs fresh thyme or rosemary (optional)

    For Assembly

    • 6 sturdy hamburger buns (brioche or potato rolls preferred)
    • 6 slices Wisconsin cheddar cheese or American cheese (optional)
    • Lettuce leaves
    • Sliced tomatoes
    • Sliced onions (raw or caramelized)
    • Pickles

    Optional Condiments

    • Yellow mustard
    • Ketchup
    • Mayonnaise

    Equipment Needed

    • Heavy cast-iron skillet or flat-top griddle
    • Spatula
    • Spoon for basting
    • Meat thermometer (optional)
    • Plate and aluminum foil for resting

    Preparation

    1. Preparing the Burger Patties

    Place the ground beef in a large mixing bowl. Gently break it apart with your hands, being careful not to overwork the meat, as this can lead to dense burgers.

    Season the beef evenly with salt, black pepper, garlic powder, and onion powder. Lightly mix until just combined.

    Divide the meat into six equal portions. Shape each portion into a patty approximately 3/4-inch thick. Press a small indentation into the center of each patty to prevent puffing during cooking.

    Place the patties on a plate, cover loosely, and refrigerate for 20–30 minutes to help them hold their shape.


    Cooking the Burgers

    2. Heating the Skillet

    Place a cast-iron skillet or griddle over medium-high heat. Allow it to preheat thoroughly for 5–7 minutes. A properly heated surface is essential for forming a crisp crust.

    Add 2 tablespoons of butter to the skillet and let it melt and foam.


    3. Searing the Patties

    Place the burger patties into the hot skillet, indentation side up. Do not overcrowd the pan; cook in batches if necessary.

    Let the patties sear undisturbed for 3–4 minutes until a deep brown crust forms on the bottom.

    Flip the patties carefully using a spatula.


    4. Butter Basting

    After flipping, add the remaining butter to the skillet along with the garlic and fresh herbs, if using.

    As the butter melts and begins to foam, tilt the pan slightly and use a spoon to continuously baste the burgers with the melted butter. This process adds richness and helps cook the burgers evenly.

    Continue basting for 2–4 minutes, depending on desired doneness:

    • Medium-rare: 130–135°F
    • Medium: 140–145°F
    • Medium-well: 150–155°F

    If adding cheese, place a slice on each patty during the final minute of cooking and cover the skillet briefly to help it melt.


    Toasting the Buns

    While the burgers cook, split the buns and lightly toast them in a separate pan or directly on the skillet using a small amount of butter until golden brown.


    Resting the Burgers

    Transfer the cooked patties to a plate and loosely tent with foil. Allow them to rest for 3–5 minutes. Resting helps the juices redistribute within the meat.


    Assembling the Burgers

    Place each burger patty on the bottom half of a toasted bun. Add desired toppings such as lettuce, tomato, onion, and pickles.

    Spread condiments on the top bun and place it over the burger.

    Serve immediately while hot.


    Tips for Best Results

    • Use high-fat ground beef for maximum juiciness
    • Avoid pressing down on the patties while cooking
    • Butter should foam, not burn; reduce heat if necessary
    • Cast iron provides the best crust and heat retention
  • Texas-Style Beef Brisket

    Texas-Style Beef Brisket

    Texas-style beef brisket is known for its simplicity, deep smoky flavor, and tender texture. Unlike many other barbecue styles, Texas brisket relies on high-quality beef, a straightforward seasoning, low-and-slow cooking, and proper resting to achieve a rich, beef-forward taste with a dark, flavorful bark.


    Ingredients

    For the Brisket

    • 1 whole beef brisket (10–14 pounds), preferably USDA Choice or Prime, with both flat and point intact

    For the Dry Rub

    • 3 tablespoons coarse kosher salt
    • 3 tablespoons freshly ground black pepper

    (Optional additions, not traditional but acceptable in some Texas kitchens)

    • 1 teaspoon garlic powder
    • 1 teaspoon onion powder
    • 1 teaspoon smoked paprika

    For Smoking

    • Oak wood chunks or logs (traditional), or hickory as an alternative
    • Yellow mustard or beef tallow (optional binder)

    For Spritzing (Optional)

    • 1 cup beef broth or water
    • 1 tablespoon apple cider vinegar

    Equipment Needed

    • Offset smoker, pellet smoker, or charcoal grill set up for indirect heat
    • Meat thermometer or probe thermometer
    • Sharp boning knife
    • Aluminum foil or unwaxed butcher paper
    • Large cutting board
    • Clean towel or insulated cooler for resting

    Preparation

    1. Selecting and Trimming the Brisket

    Choose a brisket with good marbling, especially in the flat section. Marbling ensures moisture and tenderness during the long cooking process.

    Place the brisket on a cutting board, fat side up. Trim the fat cap down to approximately 1/4 inch thickness. Remove any hard, waxy fat that will not render during cooking. Square off uneven edges to promote even cooking.

    Flip the brisket over and remove any loose meat or excess fat from the underside. Be careful not to remove too much, as the fat helps protect the meat during smoking.


    2. Seasoning the Brisket

    Pat the brisket dry with paper towels. If using a binder, lightly coat the brisket with yellow mustard or melted beef tallow. This will not affect the final flavor but helps the seasoning adhere.

    Generously season all sides of the brisket with the salt and black pepper mixture. The seasoning should form an even, visible layer. Press the rub into the meat without rubbing it off.

    Let the brisket rest at room temperature for 45 to 60 minutes, or wrap and refrigerate overnight for deeper seasoning penetration.


    Smoking the Brisket

    3. Preparing the Smoker

    Preheat your smoker to 225–250°F (107–121°C). Maintain clean, steady smoke; thin blue smoke is ideal. Avoid thick white smoke, which can cause bitterness.

    Add oak wood chunks or logs gradually to maintain consistent smoke throughout the cook.


    4. Smoking Process

    Place the brisket on the smoker with the fat side facing the heat source. This allows the fat to render and baste the meat during cooking.

    Insert a meat thermometer into the thickest part of the flat.

    Smoke the brisket uncovered for approximately 6–8 hours, or until the internal temperature reaches around 160–170°F. During this phase, the brisket will develop a dark bark and absorb smoke.

    Optionally spritz the brisket every 60–90 minutes to prevent the surface from drying out.


    5. The Stall and Wrapping

    At around 160–170°F, the brisket may enter a “stall,” where the temperature stops rising due to moisture evaporation.

    Once a good bark has formed, wrap the brisket tightly in butcher paper or aluminum foil. Butcher paper is preferred in Texas barbecue as it preserves bark texture while retaining moisture.

    Return the wrapped brisket to the smoker.


    6. Finishing the Cook

    Continue cooking at 250°F until the internal temperature reaches 200–205°F. More important than temperature is tenderness: a probe should slide into the meat with little resistance, similar to softened butter.

    This stage may take an additional 4–6 hours depending on the size of the brisket.


    Resting the Brisket

    Remove the brisket from the smoker and keep it wrapped. Place it in an insulated cooler or wrap it in towels and let it rest for at least 1 hour, preferably 2–3 hours. Resting allows the juices to redistribute throughout the meat, resulting in a moist brisket.


    Slicing and Serving

    Unwrap the brisket and separate the point from the flat if desired. Slice the flat against the grain into 1/4-inch thick slices. The point can be sliced thicker or chopped.

    Serve immediately with classic Texas sides such as white bread, pickles, onions, coleslaw, or potato salad. Sauce is optional and traditionally served on the side, not on the meat.


    Tips for Success

    • Maintain consistent smoker temperature throughout the cook
    • Do not rush the process; brisket requires patience
    • Always slice against the grain
    • Quality beef and proper rest are as important as seasoning