Category: Uncategorized

  • Skinny Lemon Cheesecake

    Skinny Lemon Cheesecake

    Introduction

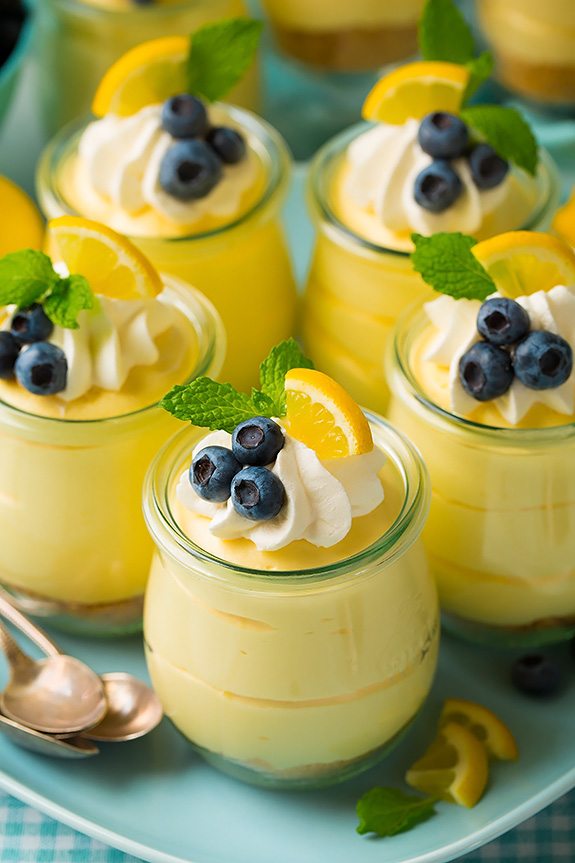
    Skinny Lemon Cheesecake is a light, refreshing dessert that delivers all the creamy texture and bright citrus flavor of classic cheesecake, but with significantly reduced fat and calories. This version uses low-fat dairy, natural sweeteners, and a lighter crust while maintaining a smooth, rich consistency. It is perfect for those who want a healthier dessert without sacrificing taste.


    Ingredients

    For the Crust

    • 1 cup whole wheat graham cracker crumbs (or digestive biscuit crumbs)
    • 2 tablespoons coconut oil or light butter, melted
    • 1 tablespoon honey or maple syrup
    • ¼ teaspoon ground cinnamon

    For the Cheesecake Filling

    • 1½ cups low-fat cream cheese, softened
    • 1 cup non-fat Greek yogurt
    • ½ cup powdered erythritol or granulated sugar
    • 2 large eggs, at room temperature
    • ⅓ cup freshly squeezed lemon juice
    • 1 tablespoon lemon zest
    • 1 teaspoon vanilla extract
    • 1 tablespoon cornstarch

    Optional Lemon Topping

    • ½ cup non-fat Greek yogurt
    • 1 tablespoon honey or powdered sweetener
    • 1 teaspoon lemon zest

    Equipment

    • 7-inch springform pan or round baking pan
    • Mixing bowls
    • Electric mixer or whisk
    • Baking tray
    • Aluminum foil

    Preparation Steps

    Step 1: Prepare the Crust

    1. Preheat the oven to 170°C (340°F).
    2. In a bowl, combine graham cracker crumbs, melted coconut oil, honey, and cinnamon.
    3. Mix until the crumbs are evenly moistened and resemble wet sand.
    4. Press the mixture firmly into the bottom of the springform pan to form an even crust.
    5. Bake the crust for 8–10 minutes until lightly golden.
    6. Remove from the oven and allow it to cool completely.

    Step 2: Prepare the Cheesecake Filling

    1. In a large mixing bowl, beat the softened low-fat cream cheese until smooth and creamy.
    2. Add Greek yogurt and continue mixing until fully incorporated.
    3. Add powdered erythritol (or sugar) and mix until smooth.
    4. Beat in the eggs one at a time, mixing gently to avoid incorporating too much air.
    5. Add lemon juice, lemon zest, vanilla extract, and cornstarch.
    6. Mix until the batter is smooth and lump-free.

    Step 3: Assemble the Cheesecake

    1. Pour the cheesecake filling over the cooled crust.
    2. Smooth the top using a spatula.
    3. Tap the pan gently on the counter to release any air bubbles.

    Baking Instructions

    Step 4: Prepare a Water Bath

    1. Wrap the bottom of the springform pan tightly with aluminum foil to prevent leaks.
    2. Place the pan inside a larger baking tray.
    3. Carefully pour hot water into the tray until it reaches halfway up the sides of the cheesecake pan.

    Step 5: Bake the Cheesecake

    1. Bake at 160°C (320°F) for 45–55 minutes.
    2. The edges should be set, while the center should still have a slight jiggle.
    3. Turn off the oven and leave the cheesecake inside with the door slightly open for 30 minutes to prevent cracking.

    Step 6: Cool and Chill

    1. Remove the cheesecake from the oven and water bath.
    2. Let it cool to room temperature.
    3. Refrigerate for at least 4 hours, preferably overnight, to fully set.

    Optional Lemon Topping

    1. In a small bowl, mix Greek yogurt, honey, and lemon zest.
    2. Spread the topping evenly over the chilled cheesecake before serving.

    Serving Suggestions

    • Slice with a sharp knife wiped clean between cuts.
    • Garnish with fresh lemon zest or thin lemon slices if desired.
    • Serve chilled for best flavor and texture.

    Tips for Best Results

    • Use room-temperature ingredients to achieve a smooth batter.
    • Avoid overmixing to prevent cracks.
    • Greek yogurt adds creaminess while reducing fat content.
    • Allow sufficient chilling time for the cheesecake to set properly.

    Storage

    • Store in the refrigerator in an airtight container for up to 4 days.
    • Cheesecake can also be frozen for up to 1 month and thawed overnight in the refrigerator.
  • Air Fryer Apple Crumble

    Air Fryer Apple Crumble

    Air Fryer Apple Crumble is a warm, comforting dessert made with tender, cinnamon-spiced apples topped with a buttery, crumbly topping. Using an air fryer shortens the cooking time while still delivering a golden, crisp crumble and soft, juicy fruit underneath. This recipe is perfect for a quick dessert or a cozy treat, and it can be served on its own or with custard, vanilla ice cream, or whipped cream.


    Ingredients

    For the Apple Filling

    • 4 medium apples (Granny Smith or Honeycrisp work best)
    • 2 tablespoons lemon juice
    • 3 tablespoons granulated sugar (adjust according to apple sweetness)
    • 1 tablespoon brown sugar
    • 1 teaspoon ground cinnamon
    • ¼ teaspoon ground nutmeg (optional)
    • 1 tablespoon cornstarch
    • 2 tablespoons water
    • 1 teaspoon vanilla extract

    For the Crumble Topping

    • ¾ cup all-purpose flour
    • ½ cup rolled oats
    • ½ cup brown sugar
    • ½ teaspoon ground cinnamon
    • ¼ teaspoon salt
    • 6 tablespoons cold unsalted butter, cut into small cubes

    Equipment

    • Air fryer
    • Oven-safe or air-fryer-safe baking dish or ramekins
    • Mixing bowls
    • Peeler and knife

    Preparation Steps

    Step 1: Prepare the Apples

    1. Peel, core, and slice the apples into thin, even slices. This ensures they cook evenly in the air fryer.
    2. Place the sliced apples in a mixing bowl and immediately toss them with lemon juice to prevent browning.
    3. Add granulated sugar, brown sugar, cinnamon, nutmeg, cornstarch, water, and vanilla extract.
    4. Mix thoroughly until the apples are evenly coated.
    5. Transfer the apple mixture into an air-fryer-safe baking dish and spread it out evenly.

    Step 2: Make the Crumble Topping

    1. In a separate bowl, combine flour, rolled oats, brown sugar, cinnamon, and salt.
    2. Add the cold butter cubes to the dry ingredients.
    3. Using your fingertips or a pastry cutter, rub the butter into the mixture until it resembles coarse crumbs with some pea-sized pieces remaining.
    4. Do not overmix, as this texture is key to a crisp topping.

    Step 3: Assemble the Crumble

    1. Evenly sprinkle the crumble topping over the prepared apples.
    2. Do not press the topping down firmly; keeping it loose allows it to crisp properly.

    Air Frying Instructions

    Step 4: Preheat the Air Fryer

    • Preheat the air fryer to 180°C (360°F) for 3–5 minutes.

    Step 5: Cook the Apple Crumble

    1. Carefully place the baking dish into the air fryer basket.
    2. Air fry at 180°C (360°F) for 15 minutes.
    3. After 15 minutes, check the topping. If it is browning too quickly, loosely cover it with aluminum foil.
    4. Continue cooking for another 5–10 minutes, until the topping is golden brown and the apples are soft and bubbling.

    Step 6: Check Doneness

    • Insert a knife into the apples to ensure they are tender.
    • The crumble topping should be crisp and lightly golden.
    • If needed, cook for an additional 2–3 minutes.

    Resting and Serving

    1. Remove the apple crumble from the air fryer and let it rest for 5 minutes.
    2. This allows the filling to thicken slightly and makes serving easier.
    3. Serve warm on its own or with vanilla ice cream, custard, or cream.

    Tips for Best Results

    • Choose firm apples that hold their shape during cooking.
    • Slice apples evenly to ensure consistent texture.
    • Cold butter is essential for a crisp crumble topping.
    • If making individual portions, reduce cooking time by 3–5 minutes.

    Storage and Reheating

    • Store leftover apple crumble in an airtight container in the refrigerator for up to 3 days.
    • Reheat in the air fryer at 170°C (340°F) for 4–6 minutes to restore crispness.
  • KFC-Style Chicken in the Air Fryer

    KFC-Style Chicken in the Air Fryer

    Introduction

    This air fryer KFC-style chicken recipe recreates the iconic crispy, flavorful fried chicken using an air fryer instead of deep oil. The secret lies in a well-seasoned flour mixture, a buttermilk marinade, and proper air-frying technique. The result is crunchy on the outside, tender and juicy on the inside, and packed with bold spices.


    Ingredients

    For the Chicken

    • 1 kg chicken pieces (drumsticks, thighs, or bone-in breast pieces preferred)
    • 2 cups buttermilk
    • 1 tablespoon salt
    • 1 teaspoon black pepper
    • 1 teaspoon paprika
    • 1 teaspoon garlic powder

    For the Seasoned Flour Coating

    • 2 cups all-purpose flour
    • 1 tablespoon paprika
    • 2 teaspoons garlic powder
    • 2 teaspoons onion powder
    • 1 teaspoon dried oregano
    • 1 teaspoon dried thyme
    • 1 teaspoon white pepper
    • 1 teaspoon black pepper
    • 1 teaspoon chili powder (adjust to taste)
    • 1 teaspoon mustard powder (optional but recommended)
    • 1 tablespoon cornstarch (for extra crispiness)
    • Salt to taste

    For Cooking

    • Cooking oil spray (neutral oil such as canola or vegetable oil)

    Preparation Steps

    Step 1: Marinate the Chicken

    1. Wash the chicken pieces thoroughly and pat them dry with paper towels.
    2. In a large bowl, add buttermilk, salt, black pepper, paprika, and garlic powder. Mix well.
    3. Add the chicken pieces to the buttermilk mixture, ensuring each piece is fully coated.
    4. Cover the bowl and refrigerate for at least 4 hours, preferably overnight. This step tenderizes the chicken and adds deep flavor.

    Step 2: Prepare the Seasoned Flour

    1. In a large shallow bowl, combine all the flour coating ingredients.
    2. Mix thoroughly so the spices are evenly distributed throughout the flour.
    3. Taste a pinch of the flour and adjust seasoning if needed.

    Step 3: Coat the Chicken

    1. Remove the chicken from the refrigerator.
    2. Take one piece of chicken at a time, allowing excess buttermilk to drip off.
    3. Dredge the chicken thoroughly in the seasoned flour, pressing the flour firmly onto the surface to create a thick, craggy coating.
    4. For extra crispiness, dip the floured chicken briefly back into the buttermilk and coat again in the flour.
    5. Place the coated chicken on a wire rack and let it rest for 10–15 minutes. This helps the coating adhere better during cooking.

    Air Frying Instructions

    Step 4: Preheat the Air Fryer

    • Preheat the air fryer to 180°C (360°F) for 5 minutes.

    Step 5: Arrange the Chicken

    1. Lightly spray the air fryer basket with oil.
    2. Place chicken pieces in a single layer, leaving space between each piece for proper air circulation.
    3. Spray the tops of the chicken generously with cooking oil. This is crucial for browning and crispiness.

    Step 6: Cook the Chicken

    1. Air fry at 180°C (360°F) for 15 minutes.
    2. Flip the chicken pieces carefully using tongs.
    3. Spray oil on the other side and continue cooking for another 12–15 minutes.
    4. Increase the temperature to 200°C (400°F) and cook for an additional 5 minutes to achieve a deep golden, crispy finish.

    Step 7: Check Doneness

    • The chicken should be golden brown and crispy.
    • Internal temperature should reach 75°C (165°F) when checked with a thermometer.
    • If needed, cook for an extra 3–5 minutes.

    Resting and Serving

    1. Remove the chicken from the air fryer and let it rest for 5 minutes.
    2. This allows the juices to redistribute, keeping the meat moist.
    3. Serve hot with coleslaw, mashed potatoes, fries, or biscuits.

    Tips for Best Results

    • Always use bone-in chicken for maximum flavor and juiciness.
    • Do not overcrowd the air fryer basket; cook in batches if necessary.
    • Oil spray is essential for achieving a fried-like texture.
    • Resting the coated chicken before cooking improves crust adhesion.

    Storage and Reheating

    • Store leftover chicken in an airtight container in the refrigerator for up to 3 days.
    • Reheat in the air fryer at 180°C (360°F) for 5–7 minutes to restore crispiness.
  • Chicken Parmesan

    Chicken Parmesan

    Introduction

    Chicken Parmesan is a classic Italian-American dish featuring breaded, golden-brown chicken breasts topped with rich marinara sauce and melted mozzarella and Parmesan cheese. Served over pasta or with a side salad, it’s a comforting, crowd-pleasing meal that kids and adults love alike.


    Ingredients

    For the Chicken

    • 4 boneless, skinless chicken breasts
    • Salt and black pepper to taste
    • 1 cup all-purpose flour
    • 2 large eggs
    • 2 tablespoons milk
    • 1 1/2 cups breadcrumbs (Italian-style or plain)
    • 1/2 cup grated Parmesan cheese
    • 1 teaspoon garlic powder (optional)
    • 1 teaspoon dried Italian herbs (optional)
    • 1/4 cup olive oil or vegetable oil (for frying)

    For the Topping

    • 1 1/2 cups marinara sauce (store-bought or homemade)
    • 1 1/2 cups shredded mozzarella cheese
    • 1/4 cup grated Parmesan cheese
    • Fresh basil leaves (optional, for garnish)

    Optional for Serving

    • Cooked spaghetti or other pasta
    • Garlic bread or side salad

    Equipment Needed

    • Skillet or frying pan
    • Three shallow bowls or plates (for dredging)
    • Tongs or fork
    • Baking dish
    • Oven
    • Measuring cups and spoons

    Preparation Steps

    Step 1: Prepare the Chicken

    1. Place each chicken breast between two sheets of plastic wrap.
    2. Using a meat mallet or rolling pin, gently pound to an even thickness (about 1/2 inch) to ensure even cooking.
    3. Season both sides with salt and black pepper.

    Step 2: Prepare the Breading Station

    1. Place flour in the first shallow bowl.
    2. In the second bowl, whisk together eggs and milk.
    3. In the third bowl, combine breadcrumbs, Parmesan cheese, garlic powder, and Italian herbs.

    Step 3: Bread the Chicken

    1. Dredge each chicken breast in flour, shaking off excess.
    2. Dip into the egg mixture, coating completely.
    3. Press into the breadcrumb mixture, ensuring the chicken is fully coated.

    Step 4: Fry the Chicken

    1. Heat 1/4 cup olive oil in a large skillet over medium heat.
    2. Fry chicken breasts for 3–4 minutes per side, or until golden brown.
    3. Transfer to a paper towel-lined plate to drain excess oil.

    Step 5: Assemble for Baking

    1. Preheat oven to 375°F (190°C).
    2. In a baking dish, spread 1/2 cup of marinara sauce on the bottom.
    3. Place fried chicken breasts on top of the sauce.
    4. Spoon remaining marinara sauce over each chicken breast.
    5. Sprinkle mozzarella and Parmesan cheese evenly on top.

    Step 6: Bake

    1. Bake uncovered for 20–25 minutes, or until cheese is melted and bubbly.
    2. Optional: Broil for 1–2 minutes at the end to brown the cheese slightly.

    Step 7: Serve

    • Serve hot over cooked spaghetti, pasta, or with a side of garlic bread.
    • Garnish with fresh basil leaves if desired.

    Tips for Perfect Chicken Parmesan

    • Even thickness: Pounding the chicken ensures even cooking and prevents dryness.
    • Crispy coating: Frying first gives a golden, crunchy crust that holds up under the sauce.
    • Cheese choice: Freshly shredded mozzarella melts better than pre-shredded.
    • Make-ahead: You can bread the chicken ahead of time and refrigerate before frying.
    • Sauce: Use a flavorful marinara for best results; homemade or high-quality store-bought works.
  • Chocolate Chip Cookies

    Chocolate Chip Cookies

    Chocolate chip cookies are one of America’s most beloved desserts. Soft in the center, slightly crisp on the edges, and packed with melty chocolate, they’re perfect for snacks, lunchboxes, or dessert. This recipe produces cookies that are chewy, buttery, and full of chocolate flavor.


    Ingredients

    • 2 1/4 cups all-purpose flour
    • 1 teaspoon baking soda
    • 1/2 teaspoon salt
    • 1 cup (2 sticks) unsalted butter, softened
    • 3/4 cup granulated sugar
    • 3/4 cup packed brown sugar
    • 1 teaspoon vanilla extract
    • 2 large eggs
    • 2 cups semi-sweet chocolate chips
    • Optional: 1 cup chopped nuts (walnuts or pecans)

    Equipment Needed

    • Mixing bowls
    • Electric mixer or hand whisk
    • Measuring cups and spoons
    • Baking sheets
    • Parchment paper or silicone baking mat
    • Cooling rack

    Preparation Steps

    Step 1: Preheat Oven

    • Preheat oven to 375°F (190°C).
    • Line baking sheets with parchment paper or a silicone mat.

    Step 2: Mix Dry Ingredients

    • In a medium bowl, whisk together flour, baking soda, and salt. Set aside.

    Step 3: Cream Butter and Sugars

    • In a large bowl, use an electric mixer to cream together softened butter, granulated sugar, and brown sugar until light and fluffy (about 2–3 minutes).
    • Mix in the vanilla extract.

    Step 4: Add Eggs

    • Beat in eggs one at a time, ensuring each is fully incorporated before adding the next.

    Step 5: Combine Wet and Dry Ingredients

    • Gradually add the flour mixture to the butter mixture, mixing on low speed or folding with a spatula until combined.
    • Do not overmix.

    Step 6: Add Chocolate Chips (and Nuts)

    • Stir in chocolate chips and nuts (if using) evenly.

    Step 7: Scoop Cookies

    • Use a cookie scoop or spoon to drop dough onto the prepared baking sheets, about 2 inches apart to allow spreading.

    Step 8: Bake

    • Bake for 9–12 minutes, or until edges are golden brown but centers remain slightly soft.
    • Rotate the baking sheet halfway through for even baking.

    Step 9: Cool

    • Allow cookies to cool on the baking sheet for 5 minutes before transferring to a wire rack to cool completely.

    Tips for Perfect Chocolate Chip Cookies

    • Room temperature butter: Ensures proper creaming and texture.
    • Don’t overbake: Centers should be slightly soft; they firm up as they cool.
    • Mix-ins: Experiment with different chocolates or add dried fruit for variation.
    • Storage: Store in an airtight container at room temperature for up to a week.
  • Classic Buffalo Wings

    Classic Buffalo Wings

    Buffalo wings are a quintessential American appetizer and snack, famous for their crispy skin and spicy, tangy sauce. Originating from Buffalo, New York, these wings are perfect for game day, parties, or casual dinners. Served with celery sticks and blue cheese or ranch dressing, they’re a crowd favorite.


    Ingredients

    For the Wings

    • 2 pounds chicken wings (split into drumettes and flats, tips removed)
    • 1 tablespoon vegetable oil
    • 1 teaspoon salt
    • 1/2 teaspoon black pepper
    • 1/2 teaspoon garlic powder (optional)

    For the Buffalo Sauce

    • 1/2 cup unsalted butter
    • 1/2 cup hot sauce (Frank’s RedHot is classic)
    • 1 teaspoon white vinegar
    • 1/4 teaspoon Worcestershire sauce (optional)
    • 1/4 teaspoon cayenne pepper (optional, for extra heat)
    • Pinch of salt

    For Serving

    • Celery sticks
    • Carrot sticks
    • Blue cheese or ranch dressing

    Equipment Needed

    • Baking sheet or air fryer
    • Large bowl
    • Small saucepan
    • Whisk
    • Aluminum foil or parchment paper (for baking)
    • Tongs

    Preparation Steps

    Step 1: Prepare the Wings

    1. Preheat oven to 425°F (220°C) if baking. If using an air fryer, preheat to 400°F (200°C).
    2. Pat chicken wings dry with paper towels to remove excess moisture.
    3. Toss wings with vegetable oil, salt, black pepper, and garlic powder (if using).

    Step 2: Cook the Wings

    Oven Method:

    1. Line a baking sheet with foil and place a wire rack on top.
    2. Arrange wings in a single layer on the rack.
    3. Bake for 40–45 minutes, flipping halfway through, until skin is golden and crispy.

    Air Fryer Method:

    1. Place wings in the air fryer basket in a single layer (cook in batches if needed).
    2. Air fry at 400°F (200°C) for 25–30 minutes, shaking the basket halfway through.

    Step 3: Make the Buffalo Sauce

    1. In a small saucepan, melt butter over low heat.
    2. Stir in hot sauce, vinegar, Worcestershire sauce (optional), cayenne (optional), and a pinch of salt.
    3. Simmer for 2–3 minutes, whisking until fully combined. Remove from heat.

    Step 4: Toss Wings in Sauce

    1. Place cooked wings in a large bowl.
    2. Pour the warm Buffalo sauce over the wings.
    3. Toss thoroughly with tongs until wings are evenly coated.

    Step 5: Serve

    • Serve immediately while hot and crispy.
    • Arrange with celery and carrot sticks.
    • Serve with blue cheese or ranch dressing for dipping.

    Tips for Perfect Buffalo Wings

    • Dry the wings well before cooking to achieve maximum crispiness.
    • Adjust heat level by increasing or reducing cayenne pepper or hot sauce.
    • Double-coat in sauce if you prefer extra sticky wings.
    • Optional broil for 2–3 minutes at the end to get extra crispy edges.
    • Leftovers: Reheat in the oven or air fryer to restore crispiness.
  • Mashed Potatoes with Gravy

    Mashed Potatoes with Gravy

    Introduction

    Mashed potatoes with gravy are a quintessential comfort food in America. Creamy, buttery potatoes paired with savory gravy make the perfect side dish for holidays, family dinners, and casual meals alike. This recipe produces smooth, fluffy mashed potatoes and rich, flavorful gravy that complement any main dish.


    Ingredients

    For the Mashed Potatoes

    • 2 pounds russet or Yukon gold potatoes (about 4–5 medium potatoes)
    • 4 tablespoons unsalted butter
    • 1/2 cup milk (warm, adjust for desired consistency)
    • 1/4 cup heavy cream (optional, for extra creaminess)
    • Salt and black pepper to taste

    For the Gravy

    • 2 tablespoons unsalted butter
    • 2 tablespoons all-purpose flour
    • 2 cups chicken or beef stock (or vegetable stock for vegetarian)
    • 1/2 teaspoon garlic powder (optional)
    • 1/4 teaspoon black pepper
    • Salt to taste
    • 1 teaspoon Worcestershire sauce (optional, for depth of flavor)

    Equipment Needed

    • Large pot for boiling potatoes
    • Medium saucepan for gravy
    • Potato masher or electric hand mixer
    • Whisk
    • Peeler and knife
    • Measuring cups and spoons

    Preparation Steps

    Step 1: Prepare the Potatoes

    1. Peel the potatoes and cut them into evenly sized chunks (about 1–2 inches).
    2. Place the potatoes in a large pot and cover with cold water to prevent uneven cooking.
    3. Add 1 teaspoon salt to the water.

    Step 2: Boil the Potatoes

    1. Bring the pot to a boil over high heat.
    2. Reduce heat to medium and simmer for 15–20 minutes, or until potatoes are fork-tender.
    3. Drain the potatoes thoroughly in a colander.

    Step 3: Mash the Potatoes

    1. Return the drained potatoes to the pot or a large mixing bowl.
    2. Add butter, warm milk, and heavy cream (if using).
    3. Mash using a potato masher or hand mixer until smooth and creamy.
    4. Season with salt and black pepper to taste. Adjust milk for desired consistency.

    Step 4: Make the Gravy

    1. In a medium saucepan, melt butter over medium heat.
    2. Whisk in the flour to form a roux and cook for 1–2 minutes until lightly golden.
    3. Gradually whisk in the stock, making sure to remove any lumps.
    4. Add garlic powder, black pepper, Worcestershire sauce (optional), and salt to taste.
    5. Simmer the gravy for 5–7 minutes until thickened. Adjust consistency with additional stock if needed.

    Step 5: Serve

    • Place mashed potatoes on a serving dish and pour gravy over the top, or serve gravy on the side.
    • Optionally, top with extra butter or chopped fresh parsley for garnish.

    Tips for Perfect Mashed Potatoes

    • Use starchy potatoes like russet or Yukon gold for fluffy, creamy texture.
    • Warm milk and cream prevent cooling down the potatoes and keep them smooth.
    • Do not overmix; overmixing can make potatoes gummy.
    • Smooth gravy: Whisk continuously while adding stock to avoid lumps.
    • Make ahead: Mashed potatoes can be kept warm in a covered dish; reheat gently and add a splash of milk if needed.
  • Barbecue Ribs

    Barbecue Ribs

    Barbecue ribs are a beloved American dish, especially during summer cookouts and family gatherings. The ribs are seasoned with a flavorful dry rub, slow-cooked until tender, and finished with a sticky, smoky barbecue sauce. This recipe works for both oven and grill, so you can enjoy tender, juicy ribs without needing a smoker.


    Ingredients

    For the Ribs

    • 2 racks of pork ribs (baby back or spare ribs, about 2–2.5 pounds each)
    • 1 tablespoon olive oil

    Dry Rub

    • 1/4 cup brown sugar
    • 1 tablespoon paprika
    • 1 teaspoon garlic powder
    • 1 teaspoon onion powder
    • 1 teaspoon salt
    • 1/2 teaspoon black pepper
    • 1/2 teaspoon chili powder
    • 1/4 teaspoon cayenne pepper (optional, for heat)

    Barbecue Sauce (Optional, but recommended)

    • 1 cup ketchup
    • 1/4 cup apple cider vinegar
    • 1/4 cup brown sugar
    • 2 tablespoons Worcestershire sauce
    • 1 teaspoon smoked paprika
    • 1/2 teaspoon garlic powder
    • 1/2 teaspoon onion powder
    • 1/4 teaspoon black pepper
    • Optional: a few dashes of hot sauce for spice

    Equipment Needed

    • Baking sheet or roasting pan
    • Aluminum foil
    • Basting brush
    • Mixing bowls
    • Sharp knife
    • Grill (optional if finishing outdoors)

    Preparation Steps

    Step 1: Prepare the Ribs

    1. Remove the thin membrane from the back of the ribs for more tender results.
    2. Pat the ribs dry with paper towels.
    3. Lightly brush both sides with olive oil to help the rub adhere.

    Step 2: Apply the Dry Rub

    1. In a small bowl, combine brown sugar, paprika, garlic powder, onion powder, salt, black pepper, chili powder, and cayenne.
    2. Generously rub the spice mixture on both sides of the ribs, pressing it into the meat.
    3. Let the ribs sit for at least 30 minutes at room temperature, or refrigerate for several hours to allow the flavors to penetrate.

    Step 3: Oven Cooking Method (Alternative: Grill Cooking)

    1. Preheat oven to 275°F (135°C).
    2. Place the ribs on a baking sheet or roasting pan and cover tightly with aluminum foil.
    3. Bake for 2.5–3 hours (baby back ribs) or 3–3.5 hours (spare ribs) until the meat is tender and starting to pull away from the bones.

    Optional Grill Finish: Preheat grill to medium heat. After baking, brush ribs with barbecue sauce and grill for 5–10 minutes per side to caramelize the sauce.


    Step 4: Make the Barbecue Sauce (Optional)

    1. In a small saucepan, combine ketchup, apple cider vinegar, brown sugar, Worcestershire sauce, smoked paprika, garlic powder, onion powder, black pepper, and hot sauce (if using).
    2. Simmer over low heat for 10–15 minutes, stirring occasionally, until thickened.

    Step 5: Sauce and Broil (Optional)

    1. Preheat oven broiler to high.
    2. Brush baked ribs generously with barbecue sauce.
    3. Place ribs under the broiler for 2–3 minutes until the sauce caramelizes. Watch carefully to avoid burning.

    Step 6: Serve

    • Cut ribs between the bones.
    • Serve hot with additional barbecue sauce on the side.
    • Recommended sides: coleslaw, cornbread, baked beans, or potato salad.

    Tips for Perfect Ribs

    • Low and slow: Cooking ribs at a low temperature ensures tender, juicy meat.
    • Remove the membrane: This helps ribs absorb flavor and become tender.
    • Rest before slicing: Let ribs rest for 5–10 minutes to lock in juices.
    • Adjust sweetness and spice: Modify sugar and cayenne in the rub to suit your taste.

    These ribs are fall-off-the-bone tender, full of smoky-sweet flavor, and perfect for any occasion, whether oven-baked or finished on the grill.

  • Apple Pie

    Apple Pie

    Introduction

    Apple pie is a beloved American dessert with a flaky, buttery crust and sweet, spiced apple filling. This recipe uses a combination of tart and sweet apples for the perfect balance of flavor and includes tips to ensure your crust stays crisp and your filling is perfectly tender.


    Ingredients

    For the Pie Crust (makes 2 crusts – top and bottom)

    • 2 1/2 cups all-purpose flour
    • 1 teaspoon salt
    • 1 tablespoon sugar
    • 1 cup (2 sticks) unsalted butter, cold and cut into small cubes
    • 6 to 8 tablespoons ice water

    For the Apple Filling

    • 6 to 7 medium apples (Granny Smith, Honeycrisp, or a mix), peeled, cored, and sliced
    • 3/4 cup granulated sugar
    • 1/4 cup brown sugar
    • 1 teaspoon ground cinnamon
    • 1/4 teaspoon ground nutmeg
    • 1/4 teaspoon salt
    • 1 tablespoon lemon juice
    • 2 tablespoons all-purpose flour or cornstarch (to thicken filling)
    • 2 tablespoons unsalted butter, cut into small pieces (to dot on top of apples before covering with crust)

    Optional for Finishing

    • 1 egg, beaten (for egg wash)
    • 1 tablespoon sugar (for sprinkling on top)

    Equipment Needed

    • 9-inch pie dish
    • Rolling pin
    • Mixing bowls
    • Pastry cutter or fork
    • Sharp knife
    • Pastry brush

    Preparation Steps

    Step 1: Prepare the Pie Crust

    1. In a large bowl, whisk together the flour, salt, and sugar.
    2. Add cold butter cubes and cut into the flour using a pastry cutter or fork until the mixture resembles coarse crumbs with some pea-sized butter pieces remaining.
    3. Gradually add ice water, 1 tablespoon at a time, mixing until the dough comes together. Avoid overworking the dough.
    4. Divide dough into two discs, wrap each in plastic wrap, and refrigerate for at least 30 minutes.

    Step 2: Prepare the Apple Filling

    1. In a large bowl, toss sliced apples with granulated sugar, brown sugar, cinnamon, nutmeg, salt, lemon juice, and flour (or cornstarch).
    2. Ensure all slices are coated evenly. Set aside.

    Step 3: Assemble the Pie

    1. Preheat the oven to 425°F (220°C).
    2. Roll out one disc of chilled dough on a lightly floured surface into a circle about 12 inches in diameter.
    3. Carefully place it into a 9-inch pie dish, letting excess hang over the edges.
    4. Pour the apple filling into the crust and dot with small pieces of butter.
    5. Roll out the second dough disc and place over the apples. Trim excess dough, leaving about 1/2 inch overhang.
    6. Fold and crimp edges to seal the top and bottom crusts.
    7. Cut small slits or shapes in the top crust to allow steam to escape.
    8. Optional: Brush the top with beaten egg and sprinkle with sugar for a golden, shiny finish.

    Step 4: Bake the Pie

    1. Place the pie on a baking sheet to catch any drips.
    2. Bake at 425°F (220°C) for 20 minutes.
    3. Reduce heat to 375°F (190°C) and bake for an additional 35–45 minutes until the crust is golden brown and the filling is bubbling.
    4. If the crust edges brown too quickly, cover them with foil.

    Step 5: Cool and Serve

    • Let the pie cool for at least 2 hours before slicing. This allows the filling to set.
    • Serve warm or at room temperature with vanilla ice cream, whipped cream, or caramel drizzle.

    Tips for Perfect Apple Pie

    • Use a mix of apples: Combining tart (Granny Smith) and sweet (Honeycrisp) apples creates a balanced flavor and texture.
    • Keep the butter cold: Cold butter in the crust ensures a flaky texture.
    • Prevent soggy crust: Toss apple slices in a little flour/cornstarch and pre-bake bottom crust for extra crispiness if desired.
    • Don’t overwork the dough: Over-kneading develops gluten and can make the crust tough.
  • Air Fryer Mozzarella Cheese Bites

    Air Fryer Mozzarella Cheese Bites

    Introduction

    Air fryer mozzarella cheese bites are a quick and easy snack or appetizer that kids and adults love alike. The mozzarella is coated in a crunchy breadcrumb mixture and air fried to golden perfection without deep frying, making them lighter but still deliciously gooey. This recipe includes tips for coating so the cheese doesn’t leak and variations for extra flavor.


    Ingredients

    • 12 mozzarella sticks (string cheese or block cut into sticks)
    • 1/2 cup all-purpose flour (or gluten-free flour)
    • 2 large eggs
    • 1 tablespoon milk or water
    • 1 cup breadcrumbs or panko breadcrumbs
    • 1/2 teaspoon garlic powder
    • 1/2 teaspoon Italian seasoning
    • 1/4 teaspoon salt
    • 1/4 teaspoon black pepper
    • Cooking spray or 1–2 teaspoons oil

    Optional Dipping Sauces

    • Marinara sauce
    • Ranch dressing
    • Garlic aioli

    Equipment Needed

    • Air fryer
    • Three shallow bowls or plates (for flour, egg, and breadcrumb coating)
    • Tongs
    • Measuring cups and spoons
    • Freezer (optional but recommended)

    Preparation Steps

    Step 1: Freeze the Cheese

    Place the mozzarella sticks on a plate or tray and freeze for at least 30 minutes. This prevents the cheese from melting too quickly during air frying, helping it hold its shape.


    Step 2: Prepare the Coatings

    1. Flour mixture: Place the flour in a shallow bowl.
    2. Egg wash: In a second bowl, whisk together the eggs and milk or water.
    3. Breadcrumbs: In a third bowl, combine breadcrumbs, garlic powder, Italian seasoning, salt, and black pepper. Mix well.

    Step 3: Coat the Cheese

    1. Roll each frozen mozzarella stick in the flour, covering all sides. Shake off excess.
    2. Dip into the egg wash, ensuring it is fully coated.
    3. Press into the breadcrumb mixture, covering completely. For an extra thick crust, repeat the egg and breadcrumb step a second time.

    Place coated sticks on a tray and return to the freezer for 10–15 minutes. This helps the coating adhere better and prevents leakage.


    Step 4: Preheat the Air Fryer

    Preheat the air fryer to 200°C (400°F) for 3–5 minutes.


    Step 5: Air Fry the Cheese

    1. Lightly spray the air fryer basket with cooking spray.
    2. Place mozzarella sticks in a single layer, leaving space between them.
    3. Spray the tops lightly with cooking spray to ensure even browning.
    4. Cook for 6–8 minutes, flipping halfway through, until golden and crispy.
    5. Keep a close eye on the first batch; cooking times may vary depending on the air fryer model.

    Step 6: Serve

    • Serve immediately while hot for gooey cheese inside.
    • Pair with marinara sauce, ranch, or garlic aioli for dipping.

    Tips for Best Results

    • Freezing is essential to prevent cheese from leaking.
    • Do not overcrowd the air fryer basket; cook in batches if necessary.
    • For extra crunch, use panko breadcrumbs instead of regular breadcrumbs.
    • You can season the breadcrumbs with paprika or chili powder for a slight kick.

    Variations

    • Spicy Mozzarella: Add 1/4 teaspoon cayenne or chili powder to the breadcrumb mixture.
    • Herb & Garlic: Mix finely chopped parsley and dried oregano into the breadcrumbs.
    • Cheese Cubes: Cut mozzarella into bite-sized cubes instead of sticks.
    • Vegan Version: Use vegan cheese sticks and plant-based milk.