Category: Uncategorized

  • Lemon Curd

    Lemon Curd

    Introduction
    Lemon curd is a smooth and creamy spread made from fresh lemon juice eggs sugar and butter. It has a bright tangy flavor balanced with richness and is commonly used as a filling topping or spread. Lemon curd can be enjoyed on toast scones pancakes cakes or used in desserts such as tarts and parfaits. This recipe provides clear measurements and detailed instructions for consistent results.

    Ingredients
    Three large eggs
    Three quarters cup granulated sugar
    Half cup fresh lemon juice
    One tablespoon lemon zest
    Six tablespoons unsalted butter cut into small pieces

    Equipment Needed
    A heat resistant bowl or saucepan
    A whisk
    A fine grater or zester
    Measuring cups
    Measuring spoons

    Preparation
    Wash and dry the lemons before zesting. Zest the lemons first then juice them to obtain fresh lemon juice. Measure all ingredients accurately before starting as the cooking process requires constant attention.

    Cooking Method
    In a heat resistant bowl or saucepan whisk the eggs and sugar together until smooth and slightly pale. Add the lemon juice and lemon zest and whisk until fully combined.

    Place the bowl over a saucepan of gently simmering water or set the saucepan over low heat. Cook the mixture slowly while whisking constantly. This gentle heat prevents the eggs from scrambling and helps create a smooth texture.

    Continue cooking for eight to ten minutes until the mixture thickens enough to coat the back of a spoon. The curd should be creamy and glossy.

    Remove from heat and immediately add the butter pieces. Whisk until the butter is fully melted and incorporated creating a rich and silky lemon curd.

    Straining Optional
    For an extra smooth texture strain the lemon curd through a fine mesh sieve to remove zest and any cooked egg bits. This step is optional but recommended for a refined finish.

    Cooling and Setting
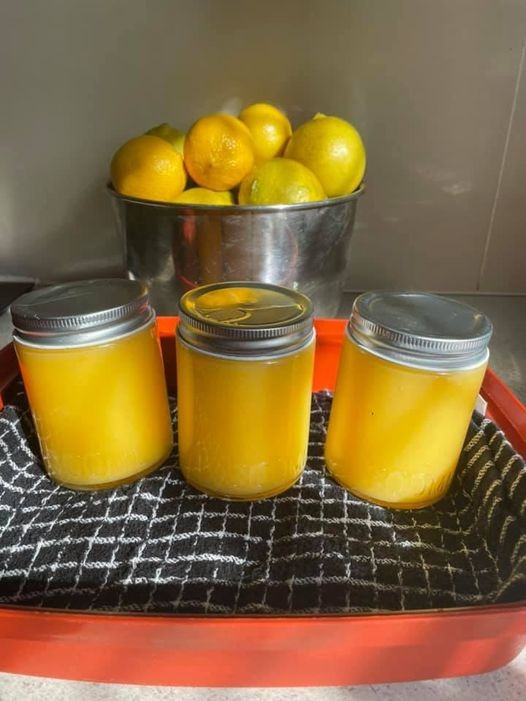
    Transfer the lemon curd to a clean jar or container. Allow it to cool at room temperature then refrigerate for at least two hours. The curd will thicken further as it chills.

    Serving Suggestions
    Lemon curd can be spread on toast scones or biscuits. It works well as a filling for cakes tarts and pastries or as a topping for yogurt ice cream or pancakes.

    Storage
    Store lemon curd in an airtight container in the refrigerator for up to two weeks. Always use a clean spoon when serving to maintain freshness.

    Tips for Best Results
    Use fresh lemon juice rather than bottled for the best flavor.
    Cook over low heat and whisk continuously to avoid curdling.
    Do not rush the thickening process.
    Strain for a smoother professional quality curd.

    Conclusion
    Lemon curd is a versatile and elegant recipe made with simple ingredients and precise measurements. This method produces a smooth tangy and creamy curd perfect for both everyday use and special desserts.

  • Garlic Butter Air Fryer Mushrooms

    Garlic Butter Air Fryer Mushrooms

    Introduction
    Garlic butter air fryer mushrooms are a quick and flavorful side dish or appetizer made with minimal ingredients. The air fryer concentrates the mushroom flavor while the garlic butter adds richness and aroma. This recipe provides exact measurements and clear steps making it ideal for a professional blog or recipe website.

    Ingredients
    Two cups whole mushrooms such as button or cremini
    Two tablespoons unsalted butter melted
    One tablespoon olive oil
    Three cloves garlic finely minced
    Half teaspoon salt
    Quarter teaspoon black pepper
    Half teaspoon dried parsley or fresh parsley finely chopped

    Equipment Needed
    An air fryer
    A mixing bowl
    Measuring cups
    Measuring spoons

    Preparation
    Clean the mushrooms by wiping them with a damp cloth or rinsing quickly under water and patting them dry. Trim the stems if needed. Leave the mushrooms whole or cut larger ones in half for even cooking.

    In a mixing bowl combine the melted butter olive oil minced garlic salt black pepper and parsley. Stir well to create a smooth garlic butter mixture.

    Add the mushrooms to the bowl and toss until they are evenly coated with the garlic butter sauce.

    Cooking Method
    Preheat the air fryer to three hundred and eighty degrees Fahrenheit. Place the coated mushrooms in the air fryer basket in a single layer. Avoid overcrowding to allow proper air circulation.

    Air fry for eight to ten minutes shaking the basket halfway through cooking. The mushrooms should become tender golden and slightly crisp around the edges.

    Checking for Doneness
    The mushrooms are ready when they are soft inside and lightly browned on the outside. If needed cook for an additional one to two minutes depending on mushroom size and air fryer strength.

    Serving Suggestions
    Serve garlic butter air fryer mushrooms hot as a side dish with grilled meats chicken or pasta. They also work well as a topping for toast rice or salads.

    Storage
    Allow leftovers to cool completely before storing. Place in an airtight container and refrigerate for up to three days. Reheat briefly in the air fryer or on a stovetop pan.

    Tips for Best Results
    Use mushrooms of similar size for even cooking.
    Do not overcrowd the air fryer basket.
    Adjust garlic amount based on preference.
    Shake the basket halfway for uniform browning.

    Conclusion
    Garlic butter air fryer mushrooms are a simple yet rich dish made with precise measurements and minimal preparation. This recipe delivers tender flavorful mushrooms with a buttery garlic finish perfect for everyday meals or entertaining.

  • Baked Chicken Thighs

    Baked Chicken Thighs

    Introduction
    Baked chicken thighs are a flavorful and satisfying main dish known for their juicy texture and rich taste. Chicken thighs are naturally tender and forgiving which makes them ideal for baking. This recipe provides clear measurements and detailed instructions to produce perfectly seasoned and evenly cooked chicken suitable for family meals or meal prep.

    Ingredients
    Six bone in skin on chicken thighs
    Two tablespoons olive oil
    One teaspoon salt
    Half teaspoon black pepper
    One teaspoon garlic powder
    One teaspoon paprika
    Half teaspoon onion powder
    Half teaspoon dried oregano or thyme
    Optional lemon wedges for serving

    Equipment Needed
    An oven
    A baking tray
    Parchment paper or aluminum foil
    A mixing bowl
    Paper towels

    Preparation
    Preheat the oven to four hundred and twenty five degrees Fahrenheit. Line a baking tray with parchment paper or foil for easy cleanup.

    Pat the chicken thighs dry with paper towels. Removing excess moisture helps the skin become crisp during baking. Place the chicken thighs in a large mixing bowl.

    Add olive oil salt black pepper garlic powder paprika onion powder and dried herbs to the bowl. Rub the seasoning mixture evenly over all sides of the chicken thighs making sure they are well coated.

    Baking Method
    Arrange the chicken thighs on the prepared baking tray skin side up leaving space between each piece. This allows heat to circulate evenly.

    Place the tray in the preheated oven and bake for thirty five to forty five minutes. The chicken should be golden brown with crispy skin and fully cooked inside.

    Checking for Doneness
    The chicken thighs are done when the internal temperature reaches one hundred and sixty five degrees Fahrenheit and the juices run clear. If additional browning is desired switch the oven to broil for two to three minutes while watching closely.

    Resting and Serving
    Remove the chicken from the oven and let it rest for five minutes before serving. Resting allows the juices to redistribute keeping the meat moist.

    Serve baked chicken thighs with roasted vegetables rice mashed potatoes or a fresh salad. Lemon wedges can be served on the side for added brightness.

    Storage
    Allow leftovers to cool completely before storing. Place in an airtight container and refrigerate for up to four days.

    Tips for Best Results
    Pat the chicken dry before seasoning for crispy skin.
    Do not overcrowd the baking tray.
    Bone in skin on thighs provide the best flavor and moisture.
    Adjust seasoning to suit your taste.

    Conclusion
    Baked chicken thighs are a reliable and flavorful dish made with simple ingredients and precise measurements. This recipe delivers juicy tender meat with crisp skin making it a perfect option for both weeknight dinners and special occasions.

  • Blueberry Overnight Oats

    Blueberry Overnight Oats

    Introduction
    Blueberry overnight oats are a nutritious and convenient breakfast option that requires no cooking. Prepared the night before this recipe allows the oats to soften naturally while absorbing the flavors of milk and blueberries. It is ideal for busy mornings and provides a balanced combination of fiber protein and natural sweetness.

    Ingredients
    Half cup rolled oats
    Half cup milk dairy or plant based
    Quarter cup plain yogurt or Greek yogurt
    Half cup fresh or frozen blueberries
    One tablespoon honey or maple syrup
    Half teaspoon vanilla extract
    One tablespoon chia seeds optional

    Equipment Needed
    A jar or container with a lid
    Measuring cups
    Measuring spoons
    A spoon for mixing

    Preparation
    Choose a clean jar or container large enough to allow stirring. Add the rolled oats milk yogurt honey and vanilla extract to the container. Stir well until all ingredients are fully combined and the oats are evenly moistened.

    Add the blueberries and chia seeds if using. Gently stir to distribute them throughout the mixture. Make sure the blueberries are well mixed so their flavor spreads evenly as the oats soak.

    Chilling Method
    Cover the container with a lid and place it in the refrigerator. Allow the oats to soak for at least six hours or overnight. During this time the oats will absorb the liquid and soften creating a creamy texture.

    Checking Consistency
    In the morning remove the container from the refrigerator and stir the oats. If the mixture is too thick add one to two tablespoons of milk and mix until the desired consistency is reached.

    Serving Suggestions
    Blueberry overnight oats can be eaten cold or slightly warmed. Top with additional blueberries sliced almonds granola or a drizzle of honey if desired. They can be enjoyed directly from the jar or transferred to a bowl.

    Storage
    Store blueberry overnight oats in the refrigerator for up to three days. Keep the container tightly sealed to maintain freshness and prevent absorption of other odors.

    Tips for Best Results
    Use rolled oats rather than quick oats for better texture.
    Fresh blueberries provide a firmer bite while frozen blueberries release more juice.
    Adjust sweetness based on personal preference.
    Stir well before refrigerating to avoid dry spots.

    Conclusion
    Blueberry overnight oats are a simple wholesome and make ahead breakfast made with precise measurements and minimal effort. This recipe offers a creamy satisfying meal that supports a healthy lifestyle while fitting easily into a busy routine.

  • Chocolate Frostys

    Chocolate Frostys

    Introduction
    Chocolate Frostys are a thick creamy frozen dessert inspired by the classic chocolate shake style treat. They have a smooth texture rich chocolate flavor and are perfect as a refreshing dessert or sweet snack. This homemade version uses simple ingredients and clear measurements making it ideal for a blog or website recipe.

    Ingredients
    Two cups whole milk
    One cup heavy cream
    Half cup sweetened condensed milk
    Quarter cup cocoa powder
    Half cup chocolate syrup
    One teaspoon vanilla extract
    Two cups ice cubes

    Equipment Needed
    A blender
    Measuring cups
    Measuring spoons
    Freezer safe glasses or serving cups

    Preparation
    Before starting make sure all ingredients are cold. Using chilled ingredients helps achieve the thick frosty texture. Measure all ingredients accurately for the best flavor balance.

    Blending Method
    Add the whole milk heavy cream sweetened condensed milk cocoa powder chocolate syrup and vanilla extract to the blender. Blend on medium speed for thirty seconds until the mixture is smooth and fully combined.

    Add the ice cubes to the blender. Blend on high speed until the mixture becomes thick smooth and creamy. This may take one to two minutes depending on blender strength. Stop and scrape down the sides if needed to ensure even blending.

    Adjusting Texture
    If the mixture is too thick add one to two tablespoons of milk and blend again. If it is too thin add a few more ice cubes and blend until the desired consistency is reached. The final texture should be thick enough to eat with a spoon but smooth enough to sip.

    Serving
    Pour the chocolate frostys into chilled serving glasses. Serve immediately for the best texture and flavor. These are best enjoyed fresh while cold and creamy.

    Optional Variations
    For a richer flavor add one tablespoon melted dark chocolate.
    For a lighter version replace heavy cream with additional milk.
    For a mocha flavor add half teaspoon instant coffee powder.

    Storage
    Chocolate frostys are best consumed immediately. If needed they can be stored in the freezer for up to one hour. Stir or reblend before serving to restore smoothness.

    Tips for Best Results
    Use high quality cocoa powder for deeper chocolate flavor.
    Blend thoroughly to avoid ice chunks.
    Serve immediately to maintain the frosty texture.
    Adjust sweetness by increasing or reducing chocolate syrup.

    Conclusion
    Chocolate frostys are an easy and indulgent frozen dessert made with simple ingredients and precise measurements. This homemade version delivers a creamy chocolate treat perfect for warm days dessert cravings or casual entertaining.

  • Air Fryer Pasta Chips

    Air Fryer Pasta Chips

    Introduction
    Air fryer pasta chips are a trendy and crunchy snack made by cooking pasta until tender and then air frying it until crisp. They are flavorful bite sized and perfect as a snack appetizer or party food. This recipe delivers clear measurements and step by step instructions for reliable and repeatable results suitable for a blog or website.

    Ingredients
    Two cups uncooked short pasta such as farfalle penne or rigatoni
    Six cups water for boiling
    One tablespoon olive oil
    Half teaspoon salt or to taste
    Half teaspoon garlic powder
    Half teaspoon paprika
    Quarter teaspoon black pepper
    Quarter cup grated parmesan cheese optional
    One teaspoon dried Italian seasoning optional

    Equipment Needed
    An air fryer
    A large pot
    A colander
    A large mixing bowl

    Cooking the Pasta
    Bring six cups of water to a rolling boil in a large pot. Add one teaspoon salt to the water. Add the pasta and cook according to package instructions until just tender. Do not overcook the pasta as it will continue to cook in the air fryer.

    Drain the pasta in a colander and allow excess water to drain completely. Let the pasta cool for five minutes so it dries slightly. Removing excess moisture helps achieve a crisp texture.

    Seasoning the Pasta
    Transfer the cooked pasta to a large mixing bowl. Add one tablespoon olive oil and toss until all pasta pieces are evenly coated. Sprinkle salt garlic powder paprika black pepper and Italian seasoning over the pasta. Mix well to ensure even seasoning.

    If using parmesan cheese add it at this stage and toss gently. The cheese will crisp and add extra flavor during air frying.

    Cooking Method
    Preheat the air fryer to three hundred and eighty degrees Fahrenheit. Place the seasoned pasta in the air fryer basket in a single layer. Avoid overcrowding and cook in batches if needed.

    Air fry for twelve to fifteen minutes shaking the basket every four minutes to ensure even cooking. The pasta should turn golden brown and crispy on the outside.

    Checking for Doneness
    The pasta chips are ready when they are firm crunchy and lightly browned. If some pieces are softer return them to the air fryer for two to three additional minutes.

    Cooling and Serving
    Remove the pasta chips from the air fryer and allow them to cool for a few minutes. They will become crispier as they cool. Taste and adjust salt if needed.

    Serve pasta chips on their own or with dipping sauces such as marinara alfredo ranch or garlic yogurt sauce.

    Storage
    Allow the pasta chips to cool completely before storing. Place them in an airtight container at room temperature for up to two days. For best texture enjoy them fresh.

    Tips for Best Results
    Use sturdy short pasta shapes that hold up well to air frying.
    Do not overcook the pasta before air frying.
    Ensure the pasta is well drained and slightly dry before seasoning.
    Cook in batches for even crisping.
    Adjust seasoning to suit your flavor preference.

    Conclusion
    Air fryer pasta chips are a crunchy and flavorful snack made with simple ingredients and clear measurements. This method transforms everyday pasta into a unique and crowd pleasing dish perfect for snacking entertaining or casual gatherings.

  • Air fryer potato chips

    Air fryer potato chips

    Introduction
    Air fryer potato chips are a healthier and homemade alternative to traditional deep fried chips. They are crispy flavorful and easy to prepare using simple ingredients. This method significantly reduces oil while still delivering a satisfying crunch. These chips are perfect as a snack side dish or party appetizer and can be customized with different seasonings to suit your taste.

    Ingredients
    Fresh potatoes such as russet or Yukon gold
    Cooking oil such as olive oil or vegetable oil
    Salt to taste
    Optional seasonings such as paprika garlic powder onion powder or black pepper

    Equipment Needed
    An air fryer
    A sharp knife or mandoline slicer
    A large bowl
    Paper towels

    Preparation
    Wash the potatoes thoroughly to remove any dirt. You may peel them if you prefer or leave the skins on for extra texture and flavor. Slice the potatoes very thin using a sharp knife or mandoline. Thin even slices are essential for achieving crisp chips.

    Place the sliced potatoes in a bowl of cold water and soak them for at least thirty minutes. This step removes excess starch which helps the chips become crispier. After soaking drain the potatoes and pat them completely dry using paper towels. Removing moisture is crucial for proper crisping in the air fryer.

    Seasoning the Potatoes
    Transfer the dried potato slices to a clean bowl. Add a small amount of oil and toss gently to coat each slice evenly. Use just enough oil to lightly coat the potatoes. Sprinkle salt and any optional seasonings over the slices and mix until evenly distributed.

    Cooking Method
    Preheat the air fryer to three hundred and sixty degrees Fahrenheit. Place the potato slices in the air fryer basket in a single layer. Avoid overcrowding as this can cause uneven cooking. You may need to cook the chips in batches depending on the size of your air fryer.

    Cook the potatoes for twelve to fifteen minutes shaking the basket every four to five minutes to ensure even cooking. Keep a close eye during the last few minutes as chips can brown quickly.

    Checking for Doneness
    The chips are done when they are golden brown and crisp to the touch. Some slices may cook faster than others so remove finished chips as needed while allowing thicker slices to continue cooking.

    Cooling and Crisping
    Once cooked transfer the chips to a plate lined with paper towels. As they cool they will continue to crisp slightly. Taste and add more salt if needed while they are still warm.

    Serving Suggestions
    Air fryer potato chips can be served on their own or with dips such as ketchup salsa sour cream or yogurt based dips. They also make a great side for sandwiches burgers or wraps.

    Storage
    Allow the chips to cool completely before storing. Keep them in an airtight container at room temperature for up to two days. For best texture consume them fresh as homemade chips may lose crispness over time.

    Tips for Best Results
    Slice potatoes as evenly and thinly as possible.
    Soak and dry the potatoes thoroughly before cooking.
    Do not overcrowd the air fryer basket.
    Adjust cooking time based on potato thickness and air fryer model.

    Conclusion
    Air fryer potato chips are a simple and delicious snack that combines crunch and flavor with less oil than traditional frying methods. With the right preparation and attention to detail you can achieve crispy golden chips that are perfect for any occasion.

  • Air Fryer Poached

    Air Fryer Poached

    Introduction
    Air fryer poached eggs are a simple and modern way to enjoy perfectly cooked eggs without using a stovetop or simmering water. This method delivers tender whites and soft creamy yolks with minimal effort. It is ideal for breakfast brunch or as a topping for toast salads and grain bowls. The air fryer provides consistent heat which helps the eggs cook evenly while maintaining their delicate texture.

    What Are Poached Eggs
    Poached eggs are eggs cooked gently without their shells in hot water or steam. The goal is to set the egg whites while keeping the yolk soft and runny. Using an air fryer recreates this gentle cooking environment by combining hot circulating air with water placed in a heat safe dish.

    Ingredients
    You will need fresh large eggs clean drinking water and optional salt or black pepper added after cooking. Fresh eggs are important because their whites hold together better during cooking which creates a neater final result.

    Equipment Needed
    An air fryer
    Heat safe ramekins or small oven safe bowls
    A kettle or saucepan to heat water
    A spoon for removing the eggs

    Preparation
    Start by preheating the air fryer to three hundred and fifty degrees Fahrenheit. Preheating ensures even cooking from the moment the eggs are placed inside. While the air fryer heats bring water to a very hot temperature just below boiling. This water will help gently cook the eggs.

    Lightly grease the ramekins with a small amount of oil if desired. This step is optional but can help prevent sticking. Pour hot water into each ramekin filling it about halfway. Carefully crack one egg into each ramekin making sure the yolk stays intact and centered.

    Cooking Method
    Place the ramekins carefully into the air fryer basket. Make sure they sit flat and do not tip over. Cook the eggs for six to eight minutes depending on how soft you want the yolk. Six minutes will give a very runny yolk while eight minutes will produce a slightly firmer center.

    During cooking avoid shaking or opening the air fryer too often as this can disturb the eggs. The circulating air and hot water will gently cook the whites while protecting the yolk from direct heat.

    Checking for Doneness
    Once the cooking time is complete carefully remove one ramekin and check the egg. The whites should be fully set and opaque while the yolk should still feel soft when gently touched with a spoon. If the whites need more time return the ramekins to the air fryer and cook for one additional minute at a time.

    Removing the Eggs
    Use a spoon to gently lift the egg out of the water. Let excess water drain off before serving. If the egg sticks slightly run a spoon around the edges to release it.

    Serving Suggestions
    Air fryer poached eggs are excellent served over toasted bread avocado toast English muffins or sautéed vegetables. They also pair well with breakfast bowls smoked salmon or fresh salads. Season with salt and pepper after cooking to taste.

    Storage and Reheating
    Poached eggs are best enjoyed immediately. However they can be stored in cold water in the refrigerator for up to one day. To reheat place the egg in hot water for about one minute until warmed through. Avoid reheating in the air fryer as this can overcook the yolk.

    Tips for Best Results
    Always use fresh eggs for the best shape and texture.
    Do not overcrowd the air fryer basket.
    Adjust cooking time based on your air fryer model since heat intensity can vary.
    Use heat safe dishes that fit comfortably inside the basket.

    Conclusion
    Air fryer poached eggs are an easy and reliable alternative to traditional poaching methods. They require minimal supervision and deliver consistent results making them perfect for home cooks of all skill levels. This technique is especially useful for preparing multiple eggs at once without the stress of boiling water on the stove.

  • Air Fryer Garlic Toast Pizza Recipe – Quick, Crispy, and Cheesy

    Air Fryer Garlic Toast Pizza Recipe – Quick, Crispy, and Cheesy

    If you’re craving a quick, cheesy, and flavorful snack, this Air Fryer Garlic Toast Pizza recipe is perfect. With crispy garlic bread as the base, melty cheese, and your favorite pizza toppings, this recipe is a game-changer for a fast lunch, dinner, or snack. Using the air fryer makes the toast crispy without using too much oil, giving you the perfect garlic pizza every time.


    Ingredients for Air Fryer Garlic Toast Pizza

    For the Garlic Toast Base

    • 4 slices of bread (white, whole wheat, or sourdough)
    • 2 tablespoons butter, softened
    • 2 cloves garlic, minced
    • ½ teaspoon dried oregano
    • ½ teaspoon dried basil
    • Pinch of salt

    For the Pizza Toppings

    • ½ cup pizza sauce or marinara sauce
    • 1 cup shredded mozzarella cheese
    • ¼ cup grated Parmesan cheese (optional)
    • ½ cup diced vegetables (bell peppers, tomatoes, onions, mushrooms – optional)
    • ¼ cup cooked meat toppings (pepperoni, cooked chicken, ham – optional)
    • Fresh basil or parsley for garnish

    Step-by-Step Instructions for Air Fryer Garlic Toast Pizza

    1. Prepare the garlic butter

    In a small bowl, combine softened butter, minced garlic, dried oregano, dried basil, and a pinch of salt. Mix well until it forms a smooth, fragrant garlic butter.

    2. Spread the garlic butter on bread

    Take your slices of bread and spread the prepared garlic butter evenly on one side of each slice. This will form the flavorful, crispy base of your garlic toast pizza.

    3. Preheat the air fryer

    Preheat your air fryer to 370°F (185°C) for 3–5 minutes. Preheating ensures that your garlic toast comes out crispy and evenly cooked.

    4. Toast the garlic bread

    Place the garlic-buttered bread slices in the air fryer basket, buttered side up. Air fry for 3–5 minutes until the edges are slightly golden and crispy.

    5. Add pizza toppings

    Remove the toasted bread from the air fryer. Spread a thin layer of pizza sauce on each slice. Sprinkle with shredded mozzarella and Parmesan cheese. Add your choice of vegetables and cooked meats evenly on top.

    6. Cook the garlic toast pizza in the air fryer

    Return the topped bread slices to the air fryer. Cook at 370°F (185°C) for 4–6 minutes, or until the cheese is fully melted and bubbly.

    • Check halfway to ensure the edges don’t burn.
    • Cooking times may vary depending on the thickness of the bread and the air fryer model.

    7. Serve and garnish

    Remove the garlic toast pizza from the air fryer. Garnish with fresh basil or parsley. Serve hot as a snack, appetizer, or quick meal.


    Tips for Perfect Air Fryer Garlic Toast Pizza

    • Use thick slices of bread for better structure and to hold toppings without getting soggy.
    • Don’t overload toppings; too many vegetables or meats can make the bread soggy.
    • Customize your pizza: Use different cheeses like cheddar, provolone, or a pizza blend for extra flavor.
    • Optional spice: Add red chili flakes or a drizzle of hot sauce for a spicy twist.
    • Crispier crust: Lightly brush the edges with extra butter before air frying.

    Storage and Reheating

    • Store leftover garlic toast pizza in an airtight container in the refrigerator for up to 1 day.
    • Reheat in the air fryer at 350°F (175°C) for 2–3 minutes to restore crispiness. Avoid microwaving, which can make it soggy.

    Why This Air Fryer Garlic Toast Pizza Recipe Works

    This Air Fryer Garlic Toast Pizza recipe delivers a crispy, buttery base with melty cheese and savory toppings in minutes. Perfect for busy days, lunch, snacks, or parties, it combines the flavors of garlic bread and pizza into one delicious treat.

  • Air Fryer Ham and Cheese and puff

    Air Fryer Ham and Cheese and puff

    If you’re looking for a quick and easy Air Fryer Ham and Cheese Puff Pastry recipe, this guide is perfect. With golden, flaky puff pastry, melty cheese, and savory ham, these bites are perfect for breakfast, brunch, or a party snack. Using an air fryer makes them crispy without deep frying.


    Ingredients for Air Fryer Ham and Cheese Puff Pastry

    • 1 sheet puff pastry (store-bought, thawed if frozen)
    • 4–6 slices of deli ham (your choice: smoked, honey, or black forest ham)
    • 1 cup shredded cheese (cheddar, mozzarella, or a mix)
    • 1 egg, beaten (for egg wash)
    • Optional: Dijon mustard, herbs (like thyme or parsley) for extra flavor

    Step-by-Step Instructions for Air Fryer Ham and Cheese Puff Pastry

    1. Prepare the puff pastry

    If using frozen puff pastry, allow it to thaw completely according to package instructions. Roll out the pastry sheet on a lightly floured surface into a rectangle about ¼ inch thick.

    2. Assemble the ham and cheese

    Place slices of ham evenly over half of the pastry sheet, leaving a small border around the edges. Sprinkle the shredded cheese on top of the ham. If using, spread a thin layer of Dijon mustard for added flavor.

    3. Fold or roll the pastry

    Fold the pastry over the ham and cheese to create a sealed rectangle, or roll it into a log for pinwheel-style bites. Press the edges gently to seal and prevent cheese from oozing out during cooking.

    4. Apply egg wash

    Brush the top of the pastry with beaten egg. This gives the puff pastry a golden, shiny finish. Optionally, sprinkle with sesame seeds, poppy seeds, or herbs for decoration.

    5. Preheat the air fryer

    Preheat your air fryer to 375°F (190°C) for 3–5 minutes. Preheating ensures even cooking and a crispy exterior.

    6. Air fry the puff pastry

    Place the prepared pastry in the air fryer basket. Air fry at 375°F (190°C) for 12–15 minutes, or until golden brown and puffed. Check halfway through and rotate if needed for even browning.

    • Make sure not to overcrowd the basket; cook in batches if necessary.
    • Cooking time may vary slightly depending on the size of the pastry and air fryer model.

    7. Cool and serve

    Remove the puff pastry from the air fryer and let it cool for 2–3 minutes before slicing. Serve warm as a snack, appetizer, or breakfast treat.


    Tips for Perfect Air Fryer Ham and Cheese Puff Pastry

    • Thaw puff pastry fully: Partially frozen pastry may not cook evenly.
    • Seal the edges well: Prevents cheese from leaking out.
    • Don’t overcrowd the air fryer: Ensures crisp, golden pastry.
    • Customize the filling: Add spinach, cooked mushrooms, or different cheeses for variety.
    • Egg wash: Gives a golden, glossy finish that makes it look bakery-ready.

    Storage and Reheating

    • Store leftover pastries in an airtight container in the refrigerator for up to 2 days.
    • Reheat in the air fryer at 350°F (175°C) for 3–5 minutes to restore crispiness.
    • Avoid microwaving, as it can make the puff pastry soggy.

    Why This Air Fryer Ham and Cheese Puff Pastry Recipe Works

    This recipe produces crispy, golden puff pastry with melty cheese and savory ham inside, perfect for a quick snack or breakfast. It’s easy, fast, and requires minimal cleanup thanks to the air fryer.