Category: Uncategorized

  • Classic Pavlova Recipe

    Classic Pavlova Recipe

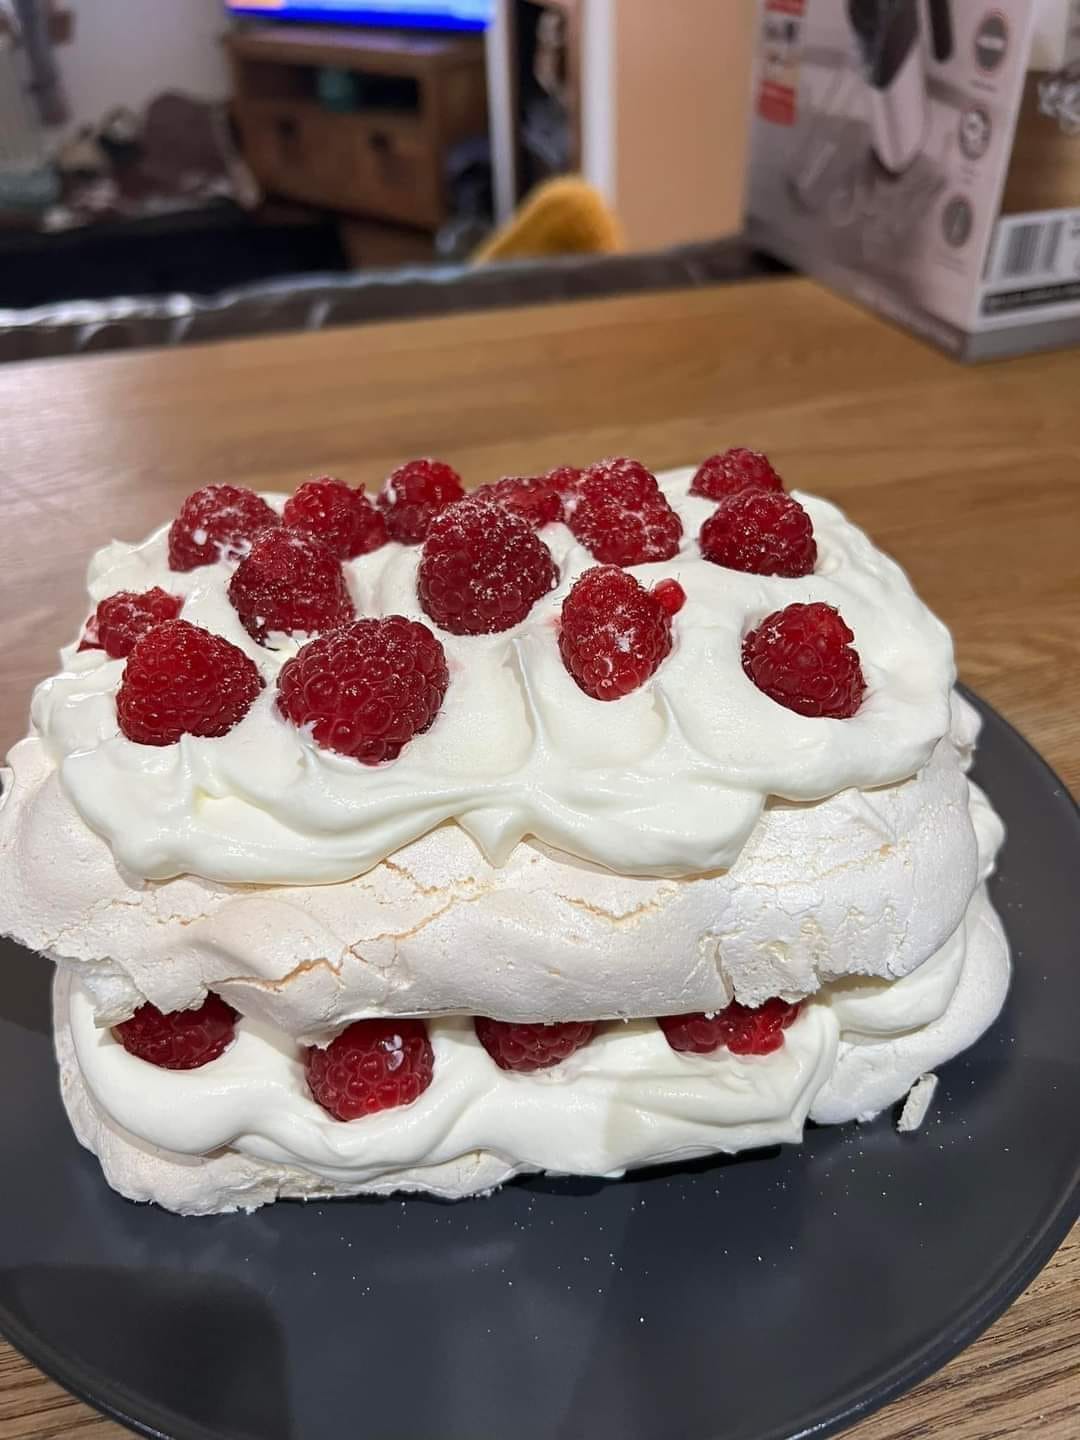
    Pavlova is a light and elegant dessert made from a crisp meringue shell with a soft, marshmallow-like center. It is traditionally topped with whipped cream and fresh fruit. While it looks impressive, pavlova is made with simple ingredients and careful technique.


    Ingredients

    Meringue Base

    • 4 large egg whites, at room temperature
    • 1 cup (200 g) granulated sugar (superfine sugar works best)
    • 1 teaspoon cornstarch
    • 1 teaspoon white vinegar or lemon juice
    • 1 teaspoon vanilla extract
    • Pinch of salt

    Whipped Cream Topping

    • 1 cup heavy whipping cream, cold
    • 2 tablespoons powdered sugar
    • ½ teaspoon vanilla extract

    Fruit Topping (Choose Any Combination)

    • Fresh strawberries, sliced
    • Kiwi, peeled and sliced
    • Blueberries or raspberries
    • Mango or passion fruit
    • Any other soft, fresh fruit

    Instructions

    1. Prepare the oven and pan

    Preheat the oven to 300°F (150°C). Line a baking sheet with parchment paper. Draw an 8-inch circle on the parchment as a guide, then flip the paper over so the pencil marks do not touch the meringue.

    2. Separate the eggs

    Carefully separate the egg whites from the yolks. Make sure no yolk gets into the whites, as even a small amount of fat can prevent the meringue from whipping properly. Let the egg whites sit at room temperature for about 20 to 30 minutes.

    3. Begin whipping the egg whites

    Place the egg whites and a pinch of salt into a clean, dry mixing bowl. Using an electric mixer, beat on medium speed until soft peaks form. Soft peaks mean the egg whites will gently fold over when the beaters are lifted.

    4. Gradually add the sugar

    Increase the mixer speed to medium-high. Add the sugar one tablespoon at a time, beating well after each addition. This step should take several minutes. Slowly adding the sugar helps create a smooth, stable meringue.

    Continue beating until the meringue is thick, glossy, and holds stiff peaks. When you rub a small amount between your fingers, it should feel smooth, not grainy.

    5. Add stabilizing ingredients

    Sprinkle the cornstarch over the meringue, then add the vinegar or lemon juice and vanilla extract. Gently fold these ingredients in using a spatula. Do not overmix.

    6. Shape the pavlova

    Spoon the meringue onto the prepared baking sheet, staying within the drawn circle. Use the back of a spoon to shape it into a round. Create a slight dip in the center to hold the cream later, leaving the edges slightly higher.

    7. Bake the pavlova

    Place the baking sheet in the oven and immediately reduce the temperature to 250°F (120°C). Bake for 1 hour and 15 minutes.

    The pavlova should be dry and lightly crisp on the outside but still pale in color. Avoid opening the oven door during baking.

    8. Cool slowly

    Turn off the oven and leave the pavlova inside with the door slightly open for at least 1 hour, or until completely cool. This slow cooling helps prevent cracks.


    Whipped Cream and Assembly

    9. Make the whipped cream

    In a cold bowl, beat the heavy cream, powdered sugar, and vanilla extract until soft peaks form. Be careful not to overwhip.

    10. Assemble the pavlova

    Gently transfer the cooled pavlova to a serving plate. Spoon the whipped cream into the center, spreading it slightly but leaving the edges visible.

    Arrange the fresh fruit on top of the cream. You can keep it simple or create a decorative pattern.


    Serving and Storage

    • Pavlova is best served immediately after assembling.
    • The baked meringue shell can be made up to 1 day in advance and stored in an airtight container at room temperature.
    • Once topped with cream and fruit, pavlova should be eaten the same day, as moisture will soften the meringue.

    Tips for Success

    • Use clean, grease-free bowls and beaters.
    • Superfine sugar dissolves more easily, giving a smoother texture.
    • Humid weather can affect meringue; dry days work best.
    • Small cracks are normal and do not affect the taste.
  • Classic Fried Chicken Recipe

    Classic Fried Chicken Recipe

    This fried chicken recipe produces crispy, golden-brown chicken on the outside with juicy, flavorful meat on the inside. It follows a traditional method using seasoning, marination, and careful frying to achieve the best texture and taste.


    Ingredients

    Chicken

    • 1 whole chicken (about 3 to 4 pounds), cut into 8 pieces, or 3 pounds mixed chicken parts (drumsticks, thighs, wings, breasts)

    Marinade

    • 2 cups buttermilk
    • 1 tablespoon salt
    • 1 teaspoon black pepper
    • 1 teaspoon paprika
    • 1 teaspoon garlic powder
    • 1 teaspoon onion powder

    Flour Coating

    • 2½ cups all-purpose flour
    • 1 tablespoon salt
    • 2 teaspoons black pepper
    • 2 teaspoons paprika
    • 1 teaspoon garlic powder
    • 1 teaspoon onion powder
    • ½ teaspoon cayenne pepper (optional, for heat)

    For Frying

    • Vegetable oil, peanut oil, or canola oil (enough to fill the pan 1½ to 2 inches deep)

    Instructions

    1. Prepare the chicken

    If using a whole chicken, cut it into pieces and pat them dry with paper towels. Removing excess moisture helps the coating stick better.

    2. Marinate the chicken

    In a large bowl, combine the buttermilk, salt, black pepper, paprika, garlic powder, and onion powder. Add the chicken pieces and make sure they are fully submerged. Cover and refrigerate for at least 4 hours, preferably overnight. This step tenderizes the meat and adds flavor.

    3. Prepare the flour coating

    In a large shallow dish, mix the flour, salt, black pepper, paprika, garlic powder, onion powder, and cayenne pepper. Stir thoroughly so the seasoning is evenly distributed.

    4. Coat the chicken

    Remove the chicken from the marinade one piece at a time, allowing excess liquid to drip off. Dredge each piece in the seasoned flour, pressing the flour firmly onto the chicken. For extra-crispy chicken, dip the floured chicken back into the marinade briefly and then coat it in flour again. Place coated pieces on a wire rack and let them rest for 10 to 15 minutes. This helps the coating adhere during frying.

    5. Heat the oil

    Pour oil into a heavy skillet or deep pan to a depth of 1½ to 2 inches. Heat the oil to 325–350°F (165–175°C). Maintaining the correct temperature is important; oil that is too hot will burn the coating, while oil that is too cool will make the chicken greasy.

    6. Fry the chicken

    Carefully place the chicken pieces into the hot oil, skin-side down if applicable. Do not overcrowd the pan; fry in batches if necessary. Fry for 12 to 15 minutes per side, turning occasionally, until the chicken is golden brown and cooked through.

    Internal temperature should reach 165°F (74°C) for white meat and 175°F (80°C) for dark meat.

    7. Drain and rest

    Remove the chicken from the oil and place it on a wire rack or paper towels to drain excess oil. Let the chicken rest for 5 minutes before serving. Resting allows the juices to redistribute inside the meat.


    Tips for Best Results

    • Use a thermometer to monitor oil temperature for consistent frying.
    • Dark meat is more forgiving and stays juicier than breast meat.
    • Letting the flour coating rest before frying helps prevent it from falling off.
    • Season the chicken immediately after frying if you want extra flavor.

    Storage and Reheating

    • Store leftover fried chicken in an airtight container in the refrigerator for up to 3 days.
    • Reheat in an oven at 375°F (190°C) for 10 to 15 minutes to restore crispiness. Avoid microwaving if possible.
  • High Protein Banana Pudding Recipe

    High Protein Banana Pudding Recipe

    High Protein Banana Pudding Recipe

    This high protein banana pudding is creamy, naturally sweet, and filling. It works well as a healthy dessert, post-workout snack, or even a breakfast. The recipe boosts protein using Greek yogurt and protein powder while keeping the classic banana pudding flavor.


    Ingredients

    Base Pudding

    • 2 ripe bananas
    • 1 cup plain nonfat or low-fat Greek yogurt
    • ½ cup milk (dairy or unsweetened almond milk)
    • 1 scoop vanilla protein powder
    • 1 tablespoon honey or maple syrup (optional, adjust to taste)
    • 1 teaspoon vanilla extract
    • 1 tablespoon cornstarch or instant pudding mix (optional, for thicker texture)

    Layers (Optional but Recommended)

    • ½ to 1 additional banana, sliced
    • High-protein vanilla wafers or regular vanilla wafers
    • Whipped topping or whipped Greek yogurt (optional)

    Instructions

    1. Prepare the bananas
      Peel two ripe bananas and place them in a blender or food processor. Ripe bananas work best because they are sweeter and blend smoothly.
    2. Blend the pudding base
      Add the Greek yogurt, milk, vanilla protein powder, honey or maple syrup (if using), and vanilla extract to the blender. Blend until completely smooth with no visible banana pieces. Taste the mixture and adjust sweetness if needed.
    3. Thicken the pudding (optional step)
      If you want a thicker, more traditional pudding texture, pour the blended mixture into a saucepan. Whisk in the cornstarch or pudding mix. Cook over medium-low heat, stirring constantly, for 5 to 8 minutes until the mixture thickens. Do not let it boil.
      If you prefer a no-cook version, you can skip this step and use the pudding as-is.
    4. Cool the pudding
      Remove the pudding from the heat and let it cool for 10 to 15 minutes. Stir occasionally to prevent a skin from forming. For faster cooling, place the bowl in the refrigerator.
    5. Assemble the pudding
      In a serving dish or individual cups, add a layer of vanilla wafers at the bottom. Spoon a layer of banana pudding over the wafers. Add sliced bananas, then repeat the layers until the container is filled. Finish with a pudding layer on top.
    6. Chill before serving
      Cover the pudding and refrigerate for at least 1 hour. Chilling allows the flavors to blend and the pudding to firm up.
    7. Add toppings and serve
      Before serving, top with whipped topping or whipped Greek yogurt if desired. Serve cold.

    Texture and Protein Tips

    • For extra protein, use a high-protein Greek yogurt or add an additional half scoop of protein powder.
    • If the pudding becomes too thick, stir in a small amount of milk to loosen it.
    • Vanilla or banana-flavored protein powder works best for a classic taste.

    Storage

    • Store covered in the refrigerator for up to 2 days.
    • For best texture, add fresh banana slices just before serving.
  • Air fryer egg toast

    Air fryer egg toast

    Air Fryer Egg Toast Recipe

    This recipe makes a crispy piece of toast with a soft or set egg cooked right in the center. It works well for breakfast, brunch, or a quick meal.

    Ingredients

    • 1 slice of bread (thick-cut bread works best, such as sourdough, Texas toast, or whole wheat)
    • 1 large egg
    • 1 teaspoon butter or oil (optional, but helps with crispiness)
    • Salt, to taste
    • Black pepper, to taste
    • Optional toppings: shredded cheese, chopped herbs, cooked bacon bits, or avocado

    Equipment

    • Air fryer
    • Spoon or the bottom of a glass
    • Small bowl (optional, for cracking the egg)

    Instructions

    1. Preheat the air fryer
      Preheat your air fryer to 350°F (175°C) for about 3 minutes. Preheating helps the toast cook evenly and become crisp.
    2. Prepare the bread
      Place the slice of bread on a flat surface. Using the back of a spoon or the bottom of a glass, press firmly into the center of the bread to create a shallow well. Do not press all the way through; the edges should stay thicker to hold the egg.
    3. Lightly grease the bread
      Spread a small amount of butter or oil over the surface of the bread, including inside the well. This step is optional but helps prevent sticking and adds flavor.
    4. Pre-toast the bread
      Place the bread into the air fryer basket. Air fry at 350°F (175°C) for 3 minutes. This step helps the bread firm up so it can support the egg without becoming soggy.
    5. Add the egg
      Remove the basket carefully. Crack the egg into a small bowl first if you want to avoid shell pieces, then gently pour the egg into the well in the bread. Make sure the yolk stays centered.
    6. Season the egg
      Sprinkle a small amount of salt and black pepper over the egg. Add any optional toppings like cheese or bacon at this stage if you want them cooked in.
    7. Air fry until set
      Return the basket to the air fryer and cook at 350°F (175°C) for 5 to 8 minutes, depending on how you like your egg:
      • 5 minutes for a runny yolk
      • 6 to 7 minutes for a jammy yolk
      • 8 minutes for a fully cooked yolk
      Check halfway through cooking. If the bread is browning too fast, you can loosely cover the top with a small piece of foil.
    8. Rest briefly
      Remove the egg toast from the air fryer and let it rest for about 1 minute. This helps the egg finish setting and makes it easier to eat.
    9. Serve
      Add extra salt, pepper, or fresh toppings like herbs or avocado if desired. Serve warm.
  • Hello world!

    Welcome to WordPress. This is your first post. Edit or delete it, then start writing!