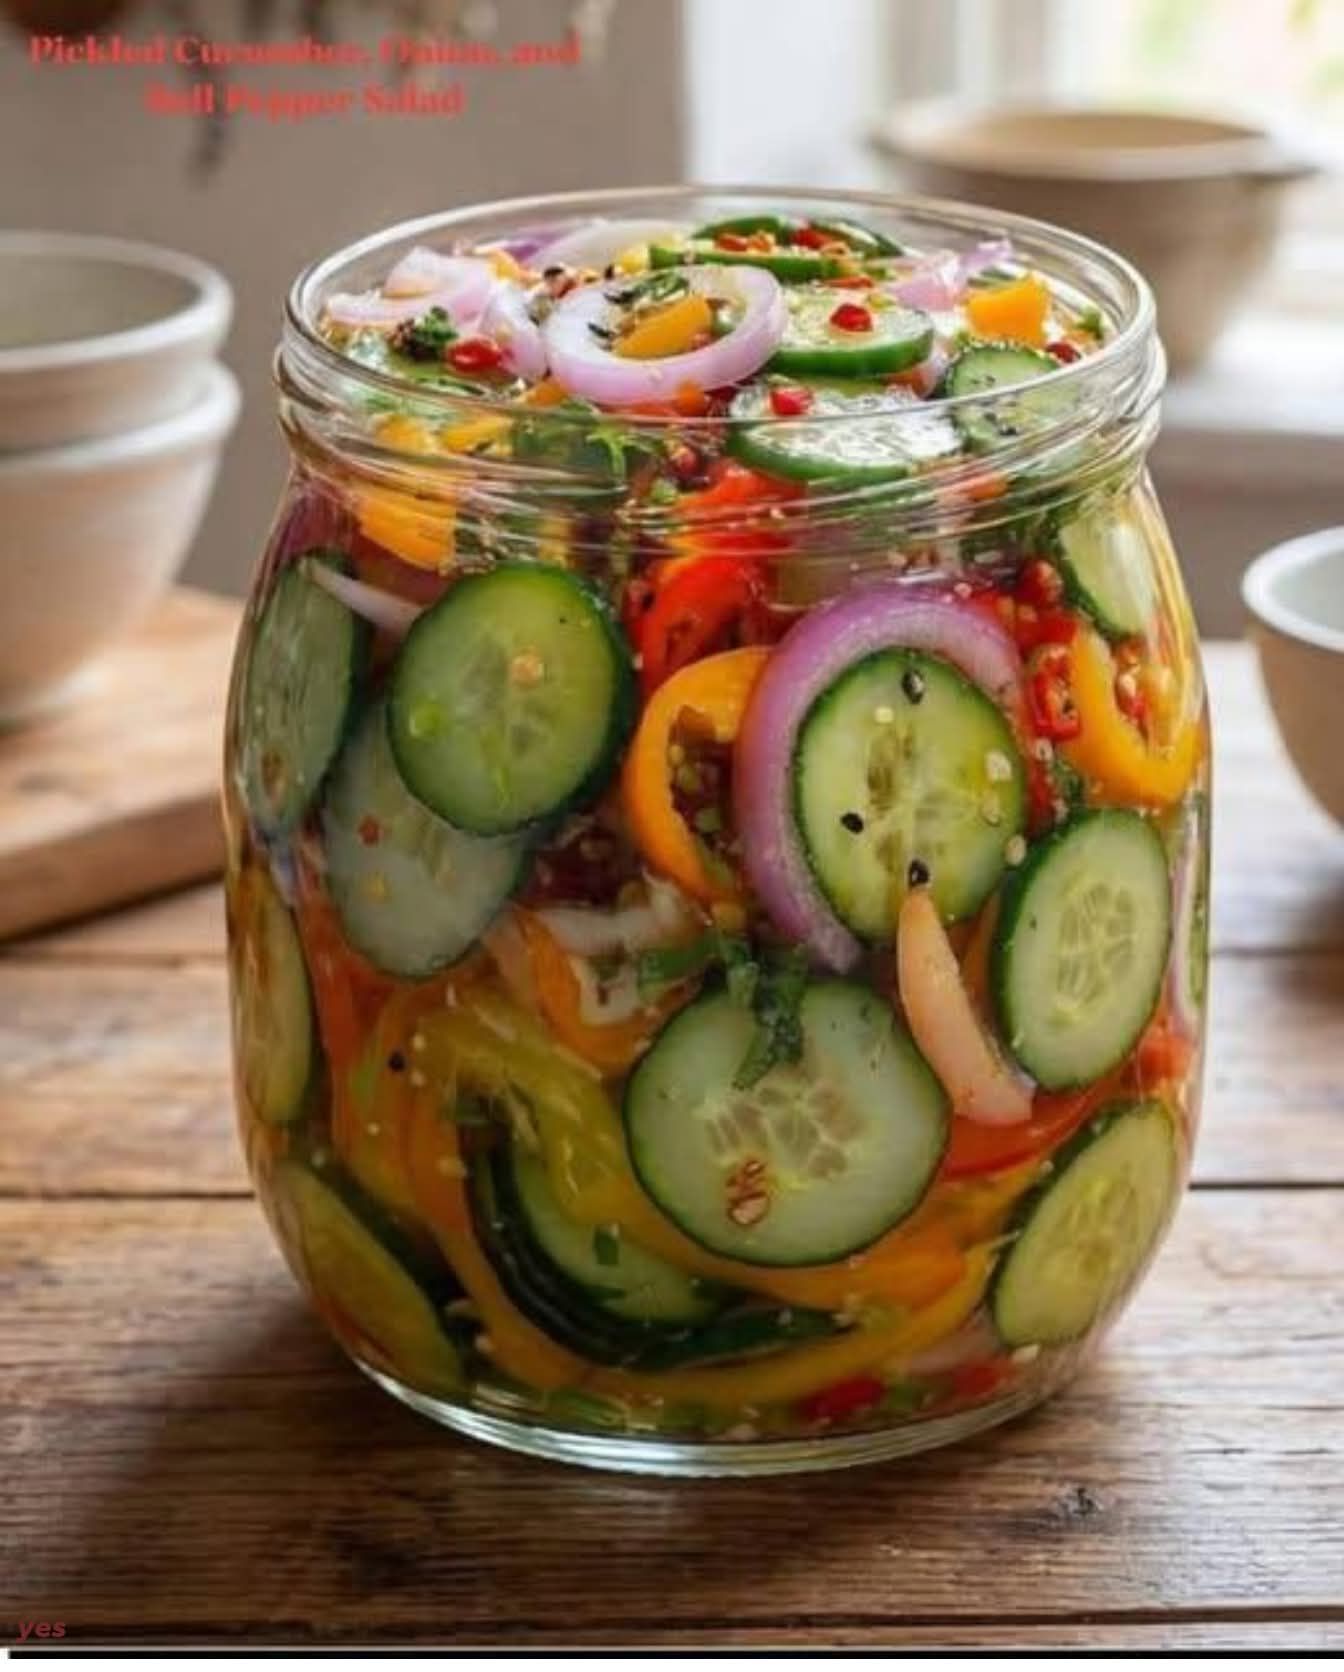
Pickled Vegetable Slaw is one of those simple preparations that can completely change an ordinary meal. Fresh, firm vegetables are sliced into thin pieces and covered with a sweet-and-sour vinegar mixture. After some time in the refrigerator, the vegetables become lightly pickled, crunchy, colorful, and full of flavor.
The best part about this slaw is how easy it is to fit into different meals. It can be added to sandwiches, hot dogs, tacos, salads, or served alongside other foods. The vegetables bring a bright, tangy crunch that makes even a simple meal feel more interesting.
There is also no complicated canning process involved. The vegetables are prepared, the pickling mixture is heated, the mixture is cooled, and everything is combined in jars before going into the refrigerator.
Why This Slaw Is So Useful
A jar of pickled vegetables can be a very handy thing to have in the refrigerator. Once prepared, the slaw is ready whenever a meal needs something crunchy and tangy.
The combination of vegetables and pickling mixture gives you several textures and flavors at once:
- Crunchy vegetables provide plenty of texture.
- Vinegar gives the slaw its characteristic tang.
- Sugar balances the sharpness of the vinegar.
- Kosher salt adds seasoning.
- Mustard seeds bring another layer of flavor.
- Optional jalapeno or hot pepper flakes can add some heat.
The vegetables remain useful for different kinds of meals because the slaw does not need to be served in only one particular way.
Choosing the Vegetables
The recipe calls for 4 to 5 cups of mixed slivered or julienned firm, raw vegetables. This gives plenty of room to create a mixture based on the vegetables available in the kitchen.
The important thing is to choose vegetables that are firm and crunchy. The original recipe suggests several possibilities, including:
- Radishes
- Red bell peppers
- Orange bell peppers
- Yellow bell peppers
- Green bell peppers
- Carrots
- Fresh sugar snap peas
- Cucumbers
- Cabbage
- Onions
These vegetables can be used to create a colorful mixture. Different colors also make the finished slaw look especially appealing when packed into jars.
The vegetables should be raw when they are prepared for the slaw. They are cut into thin slivers or julienne pieces before being covered with the pickling mixture.
Getting the Vegetables Ready
The way the vegetables are cut makes a difference to how easy the slaw is to eat. Thin strips work particularly well because they can be picked up easily with a fork and fit naturally into sandwiches, tacos, and other dishes.
A sharp vegetable knife can be used to cut the vegetables by hand. For anyone who wants to make the preparation faster, the recipe also mentions a few useful options:
- A simple mandoline with julienne blades
- A julienne peeler
- A food processor with slicing blades
The goal is not to make the vegetables complicated. They simply need to be sliced or julienned into pieces suitable for the slaw.
Once the vegetables are prepared, measure out 4 to 5 cups of the mixed vegetables. At this stage, optional jalapeno slivers or hot pepper flakes can also be included if a little heat is wanted.
Keeping the Slaw Colorful
One of the appealing things about this recipe is its mixture of colors. Carrots, cabbage, and red, yellow, and orange sweet peppers can create a bright combination.
The color is especially noticeable once the vegetables are placed into jars. Instead of looking like a plain vegetable mixture, the different colors make the slaw look fresh and inviting.
There is no need to use every vegetable listed in the suggestions. The recipe allows the slaw mixture to be made from favorite firm vegetables. The main requirement is that the vegetables are firm and raw.
Preparing the Pickling Mixture
Once the vegetables are ready, the next step is to prepare the liquid that gives the slaw its sweet-and-sour character.
The pickling mixture contains:
- 1 cup Distilled white vinegar
- 6 tablespoons sugar
- 3 teaspoons kosher salt
- 2 tablespoons mustard seeds
- 1 cup of cold water
The vinegar, sugar, salt, and mustard seeds are heated together first. The mixture is brought to a simmer in a small, non-reactive pot over moderate heat.
The purpose of heating the mixture is straightforward. The sugar and salt need to dissolve into the vinegar. There is no need to keep stirring constantly. The original method specifically calls for stirring only until the sugar and salt dissolve.
This keeps the preparation simple and prevents unnecessary steps.
Choosing the Right Pot
The type of pot matters for the pickling mixture.
A non-reactive pot should be used. The recipe specifically says not to use an aluminum pot.
Suitable choices mentioned in the recipe include:
- Stainless steel
- A pot sealed with Teflon
Using the appropriate pot keeps the process simple and follows the preparation method provided for this recipe.
Cooling the Pickling Mixture
After the vinegar, sugar, salt, and mustard seeds have been brought to a simmer and the sugar and salt have dissolved, remove the pot from the heat.
Now stir in the 1 cup of cold water.
This step helps bring down the temperature of the pickling mixture. The liquid should then be allowed to cool until it reaches a lukewarm temperature.
This cooling step is important before the liquid is poured over the prepared vegetables. Rather than immediately using the hot mixture, let it come down to lukewarm first.
While the mixture is cooling, the vegetables can be divided between the jars.
Preparing the Jars
The vegetables are divided between 3 or 4-pint jars or two-quart jars.
There is no complicated canning process in this recipe. No vacuum seals are required, and sterilized jars are not necessary.
The jars simply provide a convenient place to combine and store the vegetables with their pickling mixture.
Divide the prepared vegetables evenly between the jars. If optional jalapeno or hot pepper flakes are being used, they can be included with the vegetables.
Once the vegetables are distributed, check that there is enough room for the pickling mixture to cover them.
Combining the Vegetables and Pickling Mixture
When the vinegar mixture has cooled to lukewarm, pour it over the vegetables in the jars.
The liquid should cover the vegetables completely.
This is an important part of storing the slaw. The vegetables need to remain covered in the brine solution while they are kept in the refrigerator.
After the pickling mixture has been added, place the jars in the refrigerator.
At this point, most of the work is finished. The vegetables will continue to develop their pickled flavor while they rest.
The First Hour
The slaw does not need to wait for an entire day before it can be enjoyed.
According to the recipe, the vegetables will be lightly pickled within 1 hour.
That means the slaw can already be used when it has developed a lighter pickled flavor and still has its fresh, crunchy character.
This makes it useful when something quick is needed for a meal. Prepare the vegetables, make the pickling mixture, cool it, combine everything, and give it about an hour in the refrigerator.
What Happens After a Day?
For a stronger pickled flavor, allow the slaw to remain in the refrigerator for longer.
The recipe states that the vegetables will be fully pickled within 1 day.
During this time, the vinegar mixture works its way through the vegetables, giving them the characteristic sweet-and-sour pickled taste.
The result is a crunchy vegetable topping that can be used in several different ways.
Pouring the Cooled Mixture Over the Vegetables
Once the pickling mixture has cooled to lukewarm, it is ready to be added to the prepared vegetables.
Pour the cooled vinegar mixture over the vegetables in the jars. Try to distribute the liquid so the vegetables are properly covered.
The goal is to have the vegetables completely covered by the brine solution. This is particularly important once the jars are moved into the refrigerator for storage.
After the liquid has been added, check the jars before putting them away. If vegetables are sticking above the liquid, adjust them so they remain covered.
Refrigerating the Slaw
The finished jars should be refrigerated.
There is no need for vacuum sealing or a complicated canning procedure. This recipe is designed as a refrigerator slaw.
Keep the vegetables covered in the brine solution while they are stored.
The refrigerator gives the vegetables time to develop their pickled flavor while helping preserve the finished slaw.
When the Slaw Is Ready
There are two useful stages for enjoying this recipe.
After About 1 Hour
The vegetables are lightly pickled.
At this stage, the slaw has had enough time to take on some of the sweet-and-sour flavor while retaining its fresh, crunchy character.
After 1 Day
The vegetables are fully pickled.
For a more developed pickled taste, the slaw can be left in the refrigerator until the next day.
This makes it convenient to prepare the slaw ahead of time. It can be made before a meal or prepared the day before it is needed.
How to Serve It
This slaw is especially useful because it is not limited to one type of dish.
It can be used as a topping for:
- Sandwiches
- Hot dogs
- Tacos
- Salads
It can also be packed along for picnics because the recipe describes it as something that goes with almost anything.
On Sandwiches
A sandwich can be given a completely different texture by adding a layer of the pickled vegetables.
The crunchy vegetables work particularly well as a topping because they add a sweet-and-sour element without requiring another complicated preparation.
The slaw can be added to the sandwich just before serving.
With Hot Dogs
The pickled vegetable slaw also works as a topping for grilled hot dogs.
The crunchy vegetables add contrast to the hot dog and bring the tangy pickled flavor into the meal.
For anyone who enjoys some heat, jalapeno slivers or hot pepper flakes can be included in the slaw.
In Tacos
Tacos are another easy place to use the slaw.
A small amount of pickled vegetables can be added on top to provide crunch and a sweet-and-sour flavor.
Because the vegetables are already prepared, they can be taken directly from the refrigerator and added when serving.
On Salads
The slaw can also become part of a salad.
The vegetables provide additional crunch, while the pickled flavor adds something different from plain raw vegetables.
There is no need to limit the slaw to one particular style of salad. It can simply be used wherever a crunchy, tangy vegetable topping fits the meal.
Adding Some Heat
The recipe includes an optional addition of a few slivers of jalapeno or hot pepper flakes.
This means the heat can be kept separate from the basic slaw mixture if not everyone wants spicy vegetables.
Hot pepper flakes can also be added to a portion of the slaw rather than the entire batch.
This is a simple way to have a milder jar and a spicier jar using the same basic recipe.
Making the Slaw Your Own
The recipe is flexible when it comes to the vegetables.
The suggested choices include radishes, several colors of bell peppers, carrots, fresh sugar snap peas, cucumbers, cabbage, and onions.
The important point is to select firm, crunchy vegetables that work well for pickling.
This flexibility also makes the recipe useful when the refrigerator contains several vegetables that need to be used. Instead of preparing each vegetable separately, they can be combined into one colorful slaw.
The recipe calls for 4 to 5 cups of mixed slivered or julienned firm, raw vegetables, so the final mixture should stay within that amount.
Keeping the Vegetables Crunchy
The vegetables are meant to remain crunchy, which is one of the main attractions of this slaw.
Thinly slicing or julienning the vegetables makes them easy to eat while still giving them plenty of texture.
The pickling process adds flavor without turning the preparation into a soft vegetable dish.
For the best texture from this recipe, use firm, raw vegetables as specified.
Storage
The slaw can be kept in the refrigerator for up to a month or longer, according to the supplied recipe.
The most important storage instruction is to make sure the vegetables are completely covered in the brine solution.
Whenever the slaw is stored, keep the jars refrigerated and make sure the vegetables remain under the liquid.
This makes the slaw convenient to prepare in advance and use throughout the month.
A Simple Make-Ahead Option
This is a useful recipe to prepare ahead because the flavor continues to develop after the vegetables are placed in the refrigerator.
If lightly pickled vegetables are preferred, they can be enjoyed after about an hour.
If a fuller pickled flavor is preferred, leave them for a day.
The slaw can then be kept refrigerated and used as needed.
This makes it easy to have a ready-made crunchy topping available for different meals rather than preparing vegetables from scratch every time.
Practical Preparation Notes
A few small details make the recipe easier to follow:
- Use firm, raw vegetables.
- Cut them into slivers or julienne pieces.
- Use a non-reactive pot for the vinegar mixture.
- Do not use an aluminum pot.
- Stainless steel or a pot sealed with Teflon works well.
- Heat the vinegar, sugar, salt, and mustard seeds only until the sugar and salt dissolve.
- Stir in the cold water after removing the pot from the heat.
- Allow the mixture to cool to lukewarm.
- Divide the vegetables between the jars before adding the liquid.
- Keep the vegetables completely covered in the brine solution.
- Refrigerate the finished slaw.
- Allow about 1 hour for lightly pickled vegetables.
- Allow about 1 day for fully pickled vegetables.
The Finished Slaw
Once the vegetables have rested in the pickling mixture, they are ready to become a colorful addition to everyday meals.
The finished slaw combines crunchy vegetables with the sweet-and-sour flavor of the vinegar mixture. Mustard seeds add another flavor element, while optional jalapeno or hot pepper flakes can bring heat when desired.
Because the preparation is stored in the refrigerator, it can be used a little at a time. A few spoonfuls can turn a simple sandwich, hot dog, taco, or salad into something much more flavorful and crunchy.
The recipe is straightforward from beginning to end: prepare the vegetables, make the pickling mixture, cool it, pour it over the vegetables, refrigerate, and wait for the flavor to develop.
Final Preparation Checklist
Before serving or storing the slaw, make sure:
- The vegetables have been sliced or julienned.
- The total vegetable mixture is 4 to 5 cups.
- Any optional jalapeno or hot pepper flakes have been added if desired.
- The pickling mixture has been made with the specified ingredients.
- The mixture has cooled to lukewarm.
- The vegetables are divided between the jars.
- The vegetables are covered with the pickling mixture.
- The jars are refrigerated.
- The vegetables remain covered in the brine during storage.
After about an hour, the vegetables will be lightly pickled. After a day, they will be fully pickled and ready to use as a crunchy topping for sandwiches, hot dogs, tacos, salads, and other meals.
Classic Pickled Vegetable Slaw
 Recipe by admin1
A crunchy, colorful refrigerator slaw made with firm raw vegetables and a sweet-and-sour vinegar pickling mixture.
8
servings20
minutes5
minutes40
kcal18
minutes75
Ingredients
- Slaw Mixture
4 to 5 cups mixed slivered or julienned firm, raw vegetables
Optional: a few slivers of jalapeno or hot pepper flakes
- Pickling Mixture
1 cup Distilled white vinegar
6 tablespoons sugar
3 teaspoons kosher salt
2 tablespoons mustard seeds
1 cup of cold water
Directions
- Prepare the Vegetables
- Prepare 4 to 5 cups of mixed slivered or julienned firm, raw vegetables.
Suggested vegetables include radishes, red, orange, yellow, green bell peppers, carrots, fresh sugar snap peas, cucumbers, cabbage, or onions.
Add a few slivers of jalapeno or hot pepper flakes if desired. - Make the Pickling Mixture
- In a small, non-reactive pot, combine:
1 cup Distilled white vinegar
6 tablespoons sugar
3 teaspoons kosher salt
2 tablespoons mustard seeds
Heat over moderate heat until the mixture reaches a simmer.
Stir only until the sugar and salt dissolve. - Add the Cold Water
- Divide the prepared vegetables between 3 or 4-pint jars (or two-quart jars).Remove the pot from the heat.
Stir in 1 cup of cold water to bring down the temperature of the pickling mixture.
Allow the mixture to cool to lukewarm. - Fill the Jars
- Divide the prepared vegetables between 3 or 4-pint jars (or two-quart jars).
- Add the Pickling Mixture
- Pour the cooled vinegar mixture over the vegetables.
Make sure the vegetables are completely covered in the brine solution. - Refrigerate
- Place the jars in the refrigerator until needed.
The slaw will be lightly pickled within 1 hour and fully pickled within 1 day. - Serving Ideas
- Use the pickled vegetable slaw as a crunchy topping for:
Sandwiches
Hot dogs
Tacos
Salads
Picnics and other meals - Storage
- Keep the slaw refrigerated and make sure the vegetables remain completely covered in the brine solution.
The slaw can keep in the refrigerator for up to a month or longer, according to the recipe.
Notes
- Do not use an aluminum pot for the pickling mixture.
- Use a non-reactive pot, such as stainless steel or a pot sealed with Teflon.